![[OFFICIAL] AirDroid Remote Support- User Guide](https://test-cdn-seo.airdroid.com/img/guide/pic_bg_joinus.jpg?v=1741684483)
![[OFFICIAL] AirDroid Remote Support- User Guide](https://test-cdn-seo.airdroid.com/img/guide/pic_bg_joinus_768.jpg?v=1741684483)
Part 1: Preparation for Remote Support
Before preparing for remote support, you need to follow the steps below:
Download and Install the Essential Apps
Get Started
- Supporter need to download and install AirDroid Business for remote support, control, and management.
- Supportee need to download and install AirDroid Remote Support to receive remote assistance.
Enroll the Devices to Your Organization
Enrolling a device in your organization will tremendously increase the security and privacy of the device owner when receiving support. Please enroll the device in your organization according to the type of device as follows:
For supportee of Windows:
Windows devices can be enrolled in the organization by entering the deployment code, and the organization can perform policy management on the enrolled devices:
Step 1: Open the AirDroid Remote Support application on the Windows device. Click on "Enroll" button.
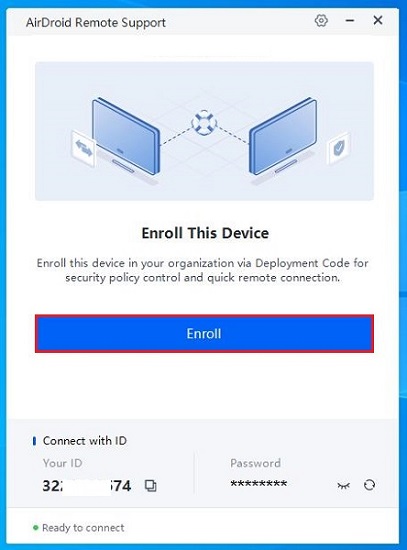
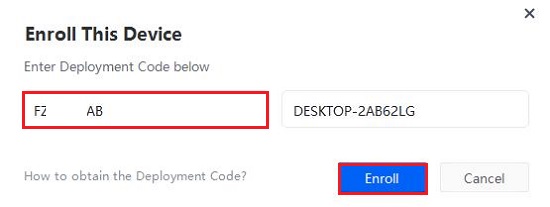
Step 2: Enter the deployment code of the organization in the pop-up window and click "Enroll." You can find the deployment code on the Admin Console (AirDroid Business Web) and AirDroid Business Desktop Client.
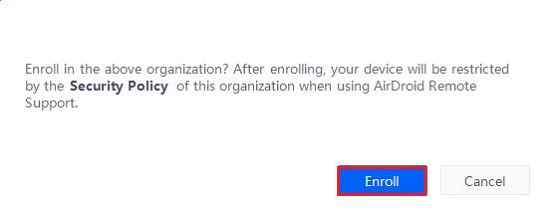
Step 3: Then a prompt will pop up, wait five seconds and click " Enroll" again to confirm your enrollment.
Step 4: Follow the prompts to select whether you want to enroll the device in attended or unattended mode.
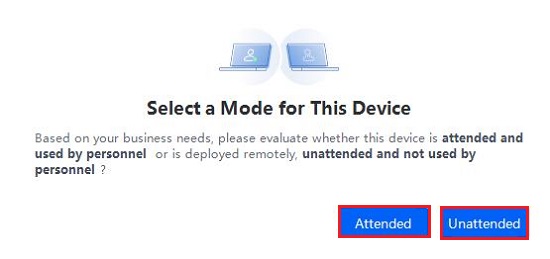
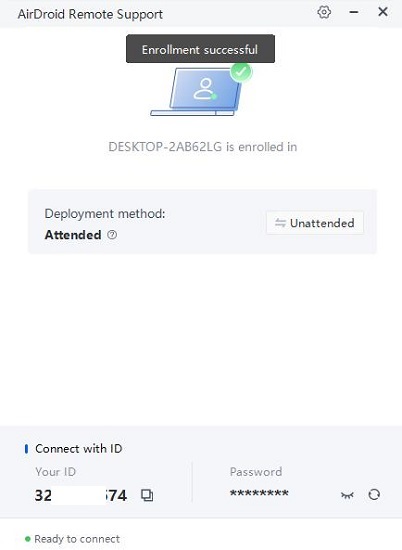
Step 5: After selecting the mode, your device is successfully enrolled in the organization.
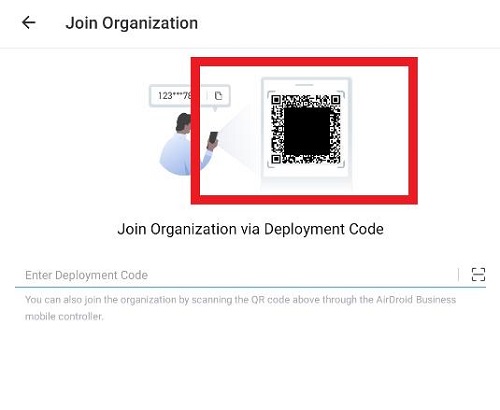
For supportee of Android & iOS:
There are two methods to enroll a device in your organization:
Insert or scan the deployment code with the client's device
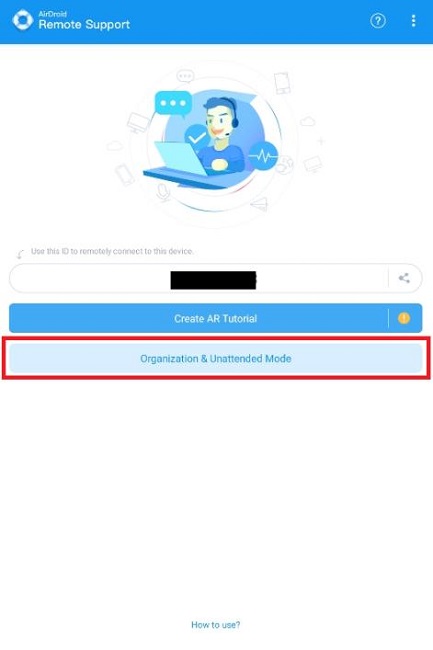
Step 1: Open the AirDroid Remote Support application on the client's device.
Step 2: Click "Organization & Unattended Mode."
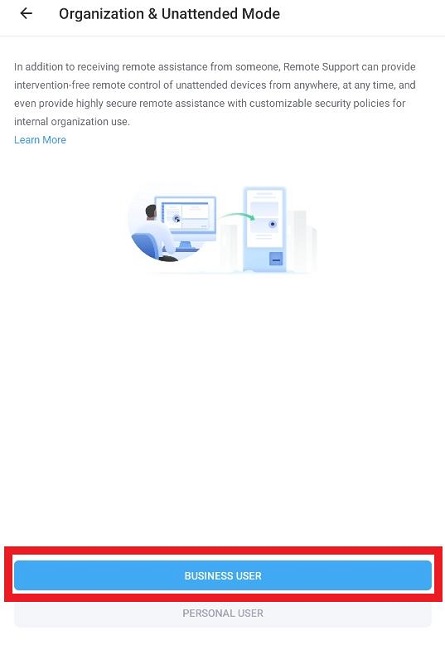
Step 3: Choose "Business User."
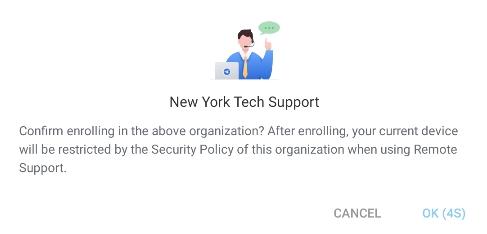
Step 4: Manually enter the unattended/attended deployment code or click the scan icon on the right, you can find the deployment code on the Admin Console (AirDroid Business Web), AirDroid Business Application, and AirDroid Business Desktop Client.
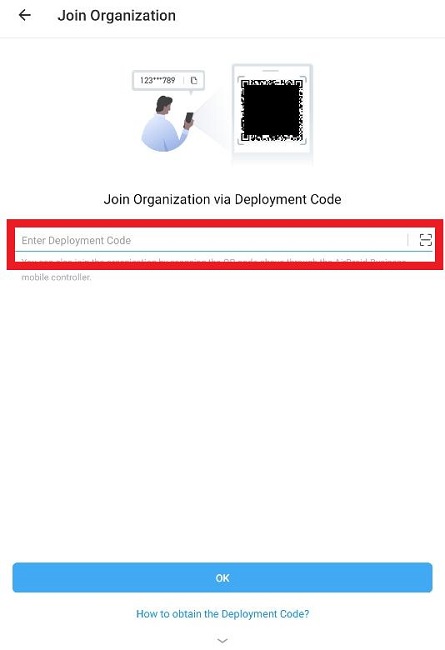
Step 5: Click "OK" after the countdown.
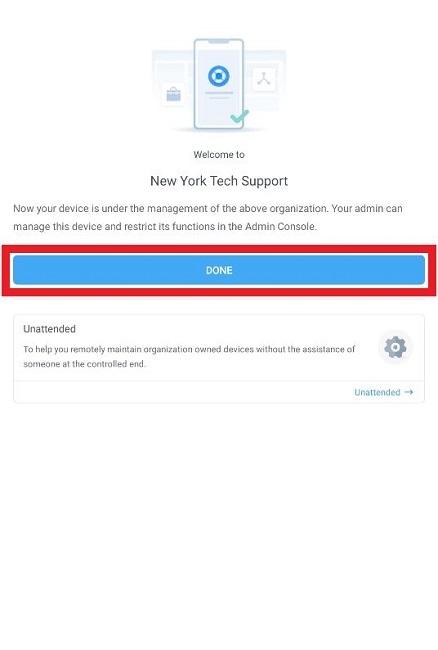
Step 6: Click "DONE."
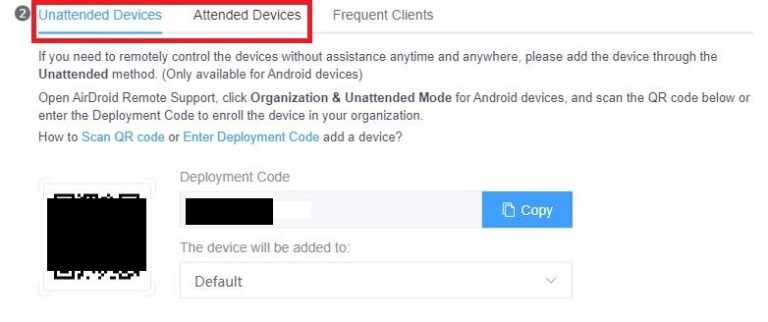
Scan the deployment code on the client's device with the supporter device
Step 1: Open the AirDroid Business application and log in to your account.
Step 2: Click the add device icon on the top right.
![]()
![]()
Step 3: Click the scan icon on the top right.
![]()
![]()
Step 4: Scan the QR code shown on the AirDroid Remote Support application of the client's device.
Step 5: Choose the device group on the controller.
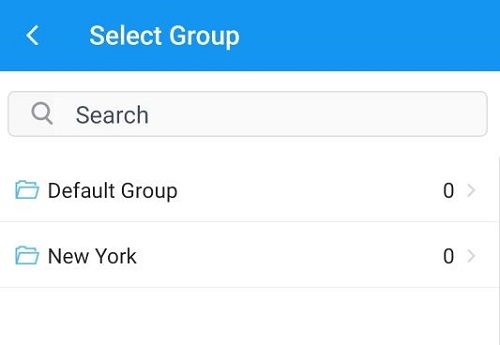
Step 6: Click the "OK" on the client's device after the countdown to complete the process.
Device Group Management
After the device is enrolled, you can manage your devices and take certain actions on the Admin Console (AirDroid Business Web). Please note that the Device List is only available for the Standard plan or above.
Step 1: Find the specific device you want to take action on from a specific group or "All Devices."

Step 2: On the top of the page of each group, you can check the number of devices for each type of device.
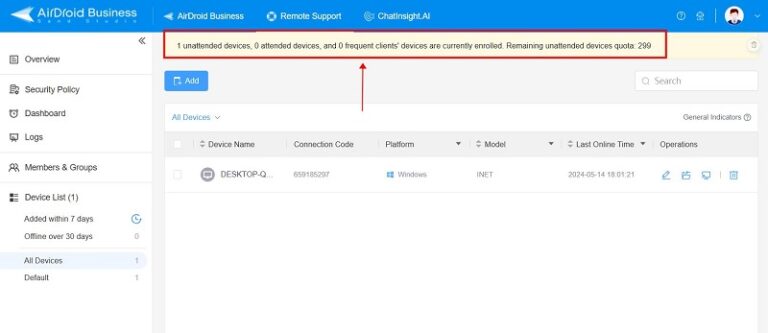
Step 3: On the device group page, you can check device information and take operations such as editing the device name or remark, group moving, or deleting a device from your organization.

Member Management & Permission Settings
With the Standard plan or above, you can invite and manage multiple members to help you support your customers or unattended devices. You can also distribute the enrolled devices to different groups to ensure the supporters support the correct devices or customers.
To create and manage the device groups, please follow the steps below:
Step 1: Login the Admin Console (AirDroid Business Web) > Remote Support > Members & Groups > Groups.
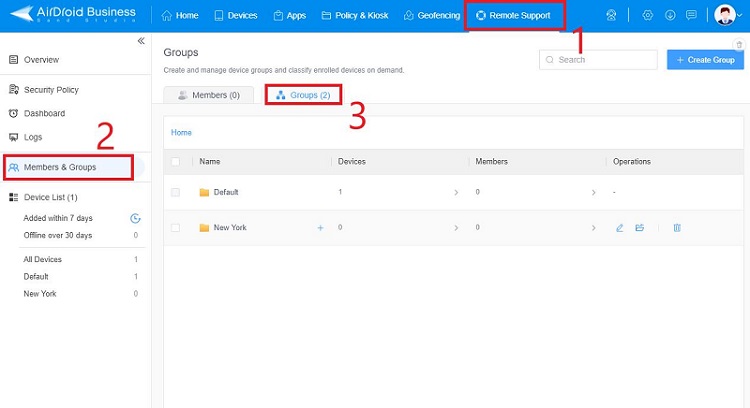
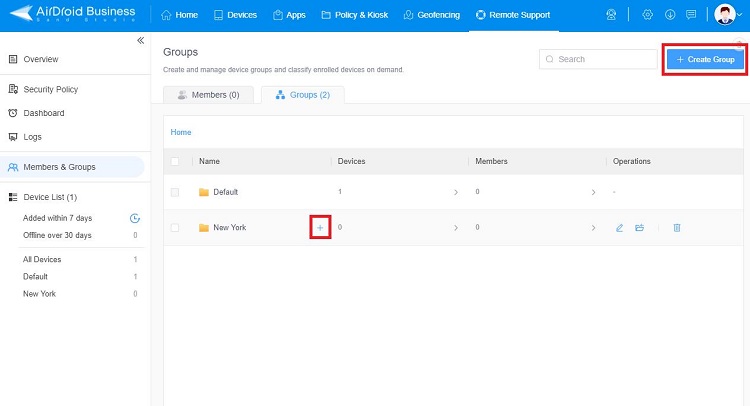
Step 2: You can click "+Create Group" to create a new group, or click the "+" icon next to a group to create a sub-group.
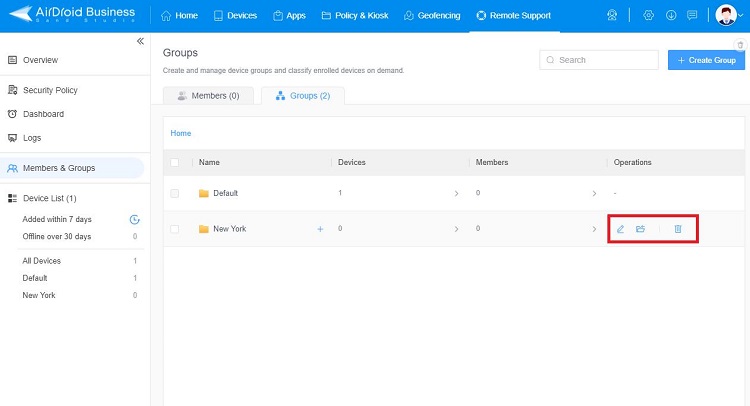
Step 3: You can edit the group information, move a group to sub- or upper-level and delete an empty group with the function on the "Operations" column.
After the groups are set, you can invite a new member with specific group permission or assign specific groups to existing members:
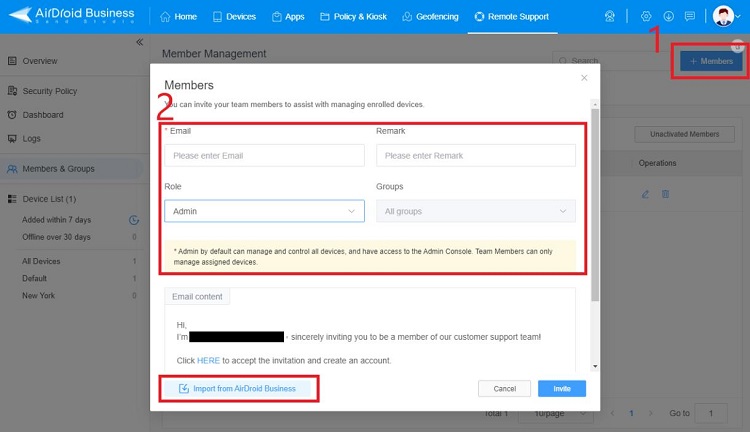
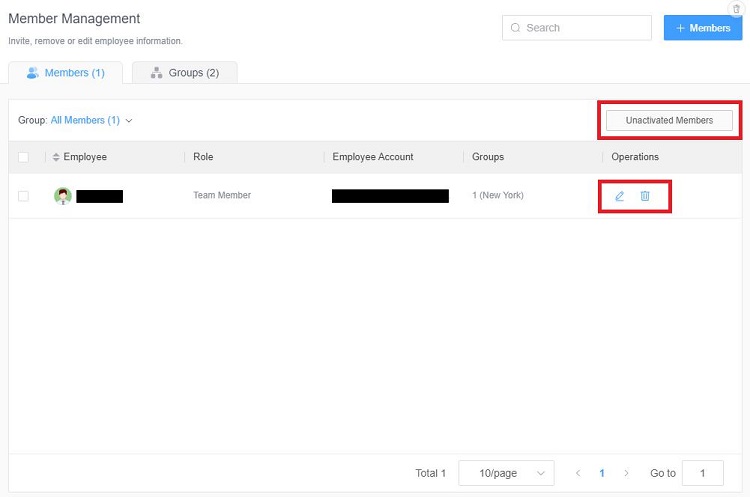
Step 1: Go to Members & Groups > Members.
Step 2: Click "+Members" on the top right and input the essential information to invite a new member. You can also import a member from AirDroid Business if you are using AirDroid Business simultaneously. The definition of the Role is just under the Role option.
Step 3: You can edit a member's permission, remove a member, and check the information of an unactivated member with the functions on the Members page.
Set Up Security Policy
Security Policy in AirDroid Remote Support enables you to further ensure the privacy and security of your clients once the device is enrolled in your organization.
Following is a brief introduction to the Security Policy you can set in the Admin Console (AirDroid Business Web):
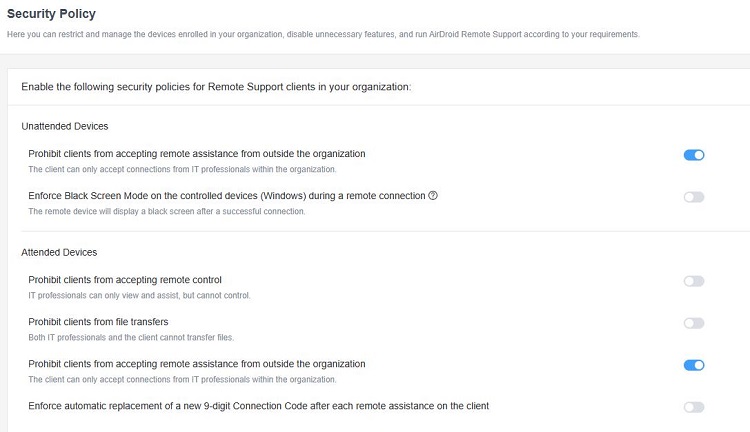
- Prohibit clients from accepting remote control: This option can limit your supporter from controlling the client's device. The supporter can only see the shared screen and assist accordingly.
- Prohibit clients from file transfers: This option will limit the file transfer between the supporter and the client's device. It can make sure both parties refrain from transferring any unnecessary files into or out of the organization or client's device.
- Prohibit clients from accepting remote assistance from outside the organization: As anyone with the 9-digit connection code could initiate a remote support session, this option will force the client whose device is enrolled in your organization only to receive support from your organization to ensure the security of your clients.
- Enforce automatic replacement of a new 9-digit Connection Code after each remote assistance on the client: This option will force the 9-digit connection code to be changed after every remote support session. In the Basic plan, it will immensely increase the security of the client's privacy as the supporter will not be able to initiate any remote support session at will after the previous session is ended. In the Standard plan, although your supporter can remotely connect the device without the code, the option can increase security if you allow the client to receive support from other organizations or teams.
Please note that for the Security Policy to take effect on the devices and the supporter client, the devices must be enrolled in your organization.
Part 2: Remote Support for Windows
System Requirements:
- Controlled Devices: Supports Windows 7 SP1 or above
- Black Screen Mode: Supports Windows 10 20H1 or above
To remotely support Windows devices using AirDroid Remote Support, please refer to the following steps:
Connection
After you and your customer installed the essential applications, you can start a support session with no effort. There are two methods to initiate a support session, please check the steps below:
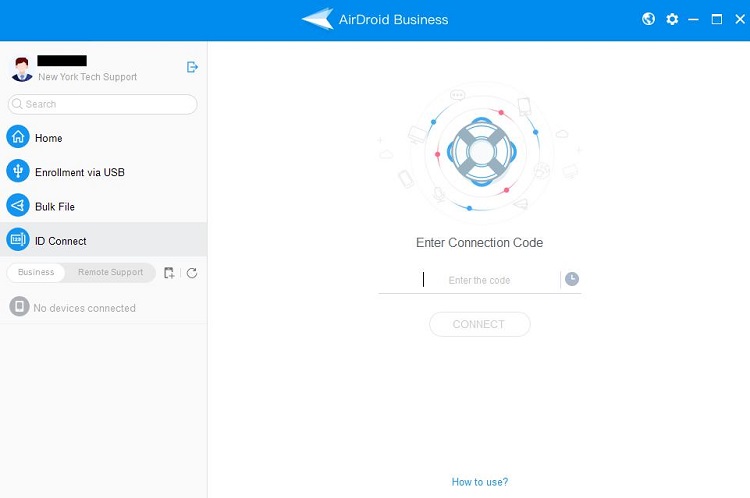
To initiate a support session with a 9-digit connection code
There are two ways to connect by the connection code:
a. Enter the connection code and password
b. Enter only the connection code
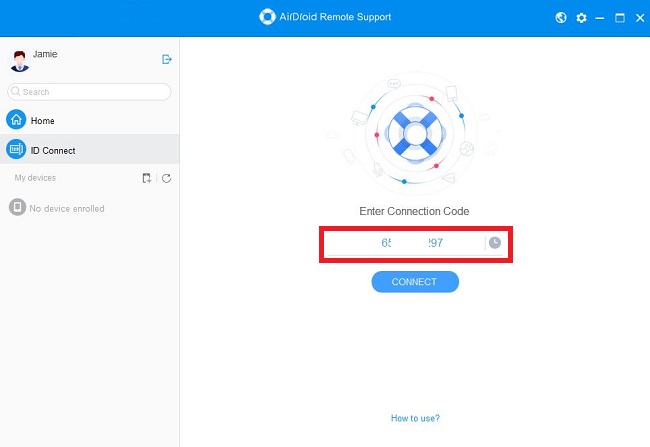
Step 1: Open the AirDoird Business Desktop Client and choose "ID Connect," there is a place for you to enter the 9-digit connection code from the customer. For example:
Step 2: Next, the Desktop Client will ask you to enter the connection password for the controlled end. If you enter the connection code and password to connect, you can directly connect successfully without the consent of the controlled end.
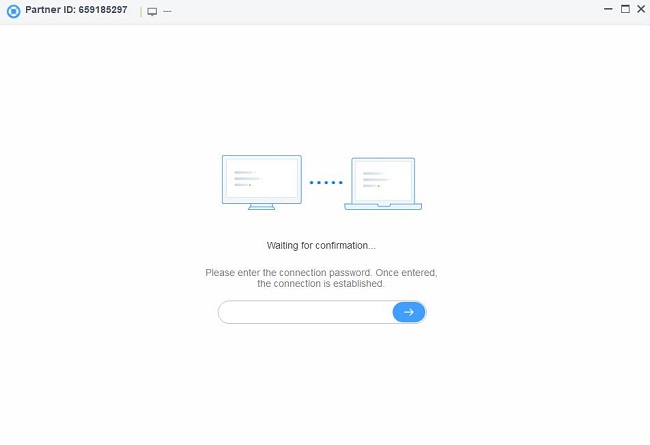
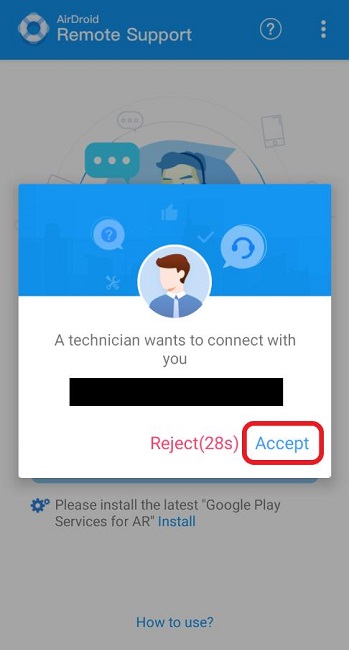
Step 3: At the same time, the controlled end will also receive a connection request on the computer. If the controlled end clicks "Accept," you do not need to enter the password to connect.

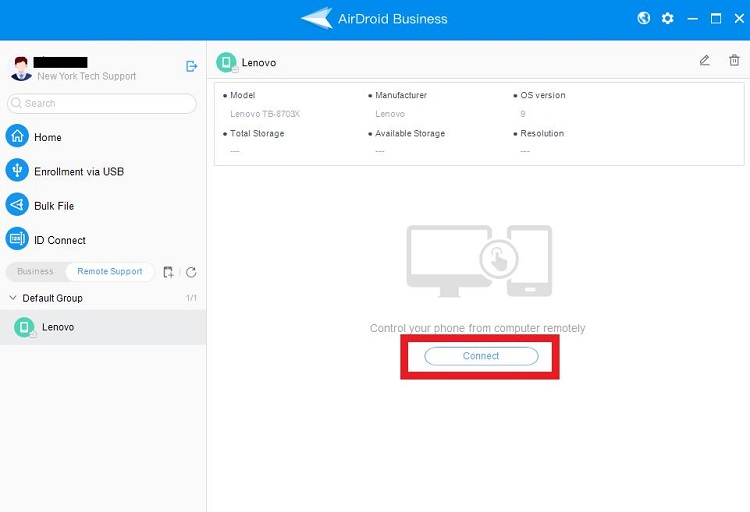
To initiate a support session with the Device List:
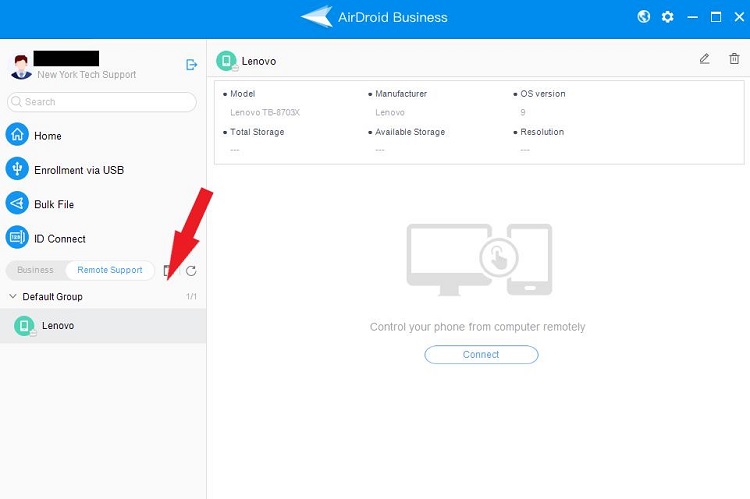
Step 1: Once the device is enrolled in your organization or added as a Frequent Client's Device, you can locate the device on the device list and initiate a remote support session directly.
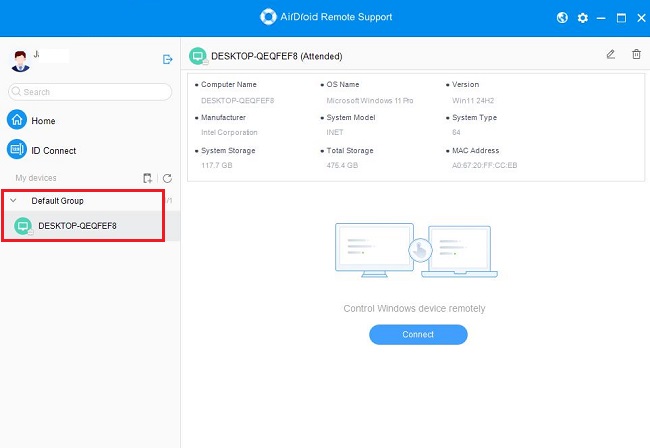
Step 2: You can initiate the remote support session without manually inserting the 9-digit connection code by clicking "Connect."
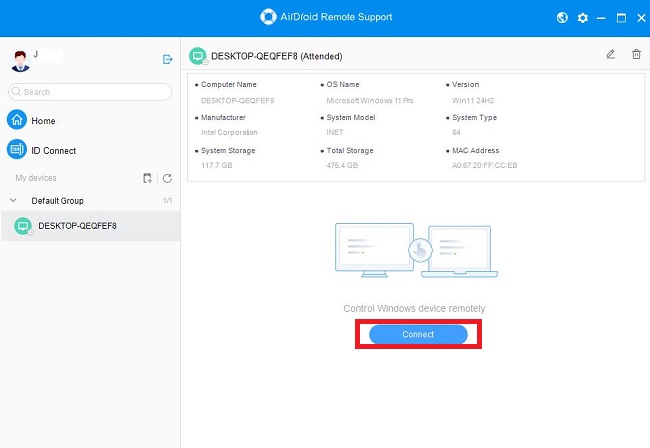
Step 3: If the device is enrolled as an unattended device then the session should start immediately. If the device is enrolled as an attended device or added as a frequent device, once the customer clicks "Accept" from their end, the session will be started.
Remote Control
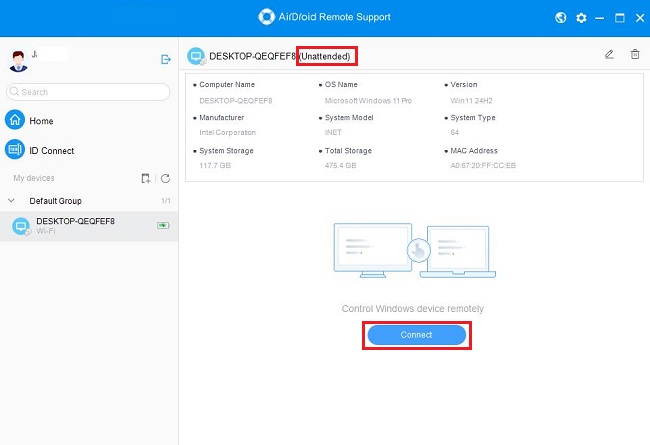
Once the device is successfully connected, you can remotely control the employee or customer's Windows device. You can view information about the device at the top left. As shown below:
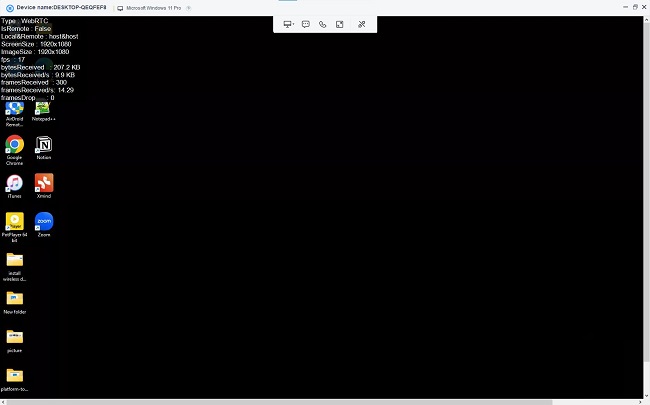
There are many advanced features that you can use to assist the controlled end during remote control of Windows. Below we describe the features on the toolbar in more detail:

1. Switch Screen
If the controlled end has more than one screen, you can switch the screen that you want to control remotely.
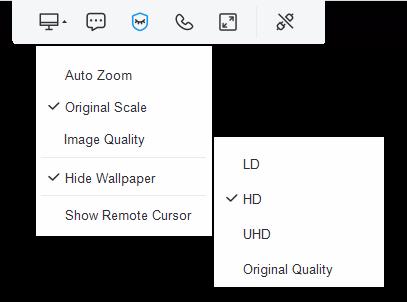
2. Display
The screen display can be adjusted between Auto Zoom and Original Scale. The image quality can be adjusted to LD, HD, UHD, and Original Quality.
Hide Wallpaper is selected by default. The remote device will hide the original desktop wallpaper and the desktop background is displayed in black, which can reduce the performance consumption during remote control.
Show Remote Cursor is unchecked by default. When checked, the mouse of the remote device can be displayed on the controller end.
3. Chat
You can also use the Chat feature to chat with each other in text or voice messages, send files, and more.

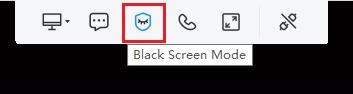
4. Black Screen Mode (Only for unattended mode)
It enables IT admins to hide the screen image of the remote device during the remote control session and a hint saying "This device is under maintenance" will be shown. More details on Black Screen Mode will be provided later.
5. Voice Call
In addition to the toolbar at the top of the controller end to enable voice call, both the controller and the controlled end can enable voice call in the chat window.
6. Enter full screen
Displays the screen of the controlled end in full screen.
7. Disconnection
After completing the assistance, click "Disconnection" to terminate the remote session.
Unattended Mode
If you have enrolled the Windows as an unattended device by following the guide for enrolling devices, you can initiate support directly on the Desktop Client. If you have enrolled the Windows as an attended device, you can also switch the device to unattended mode.
Device has been added to the organization as an unattended device
After enrolling an unattended device in your organization, you can log in to the Admin Console (AirDroid Business Web) and check the status of the device at any time for maintenance.
You can find the Windows device you want to control remotely on AirDroid Business Desktop Client and click "Connect" to initiate a remote session without the consent of the controlled end.
Device has been added to the organization as an attended device
After enrolling an attended Windows in your organization, you could enable the Unattended Mode for your device so that you can remote control the unattended devices when needed.
To enable the Unattended Mode, please follow the steps below:
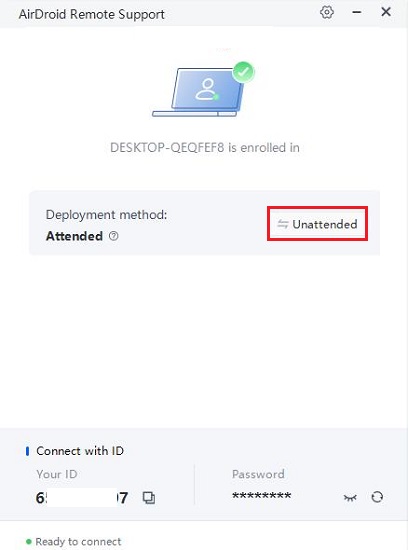
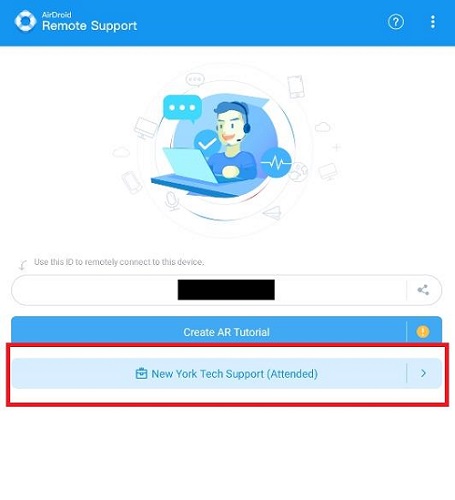
Step 1: If you already enrolled the device in your organization, please open the AirDroid Remote Support application on the enrolled device and click on the "Unattended" button next to "Attended."
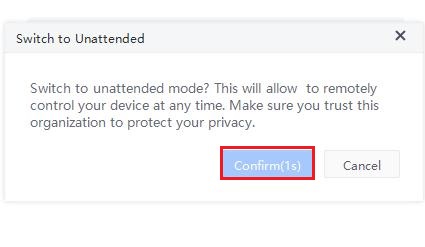
Step 2: You will have to wait for 5 seconds and click "Confirm" to give consent for activating the Unattended Mode.
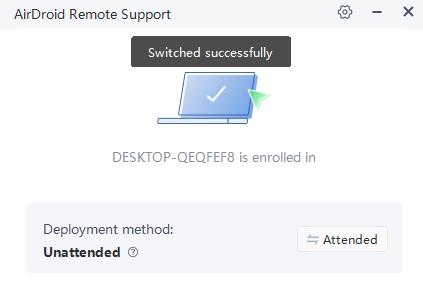
Step 3: Now, the Windows device has been successfully switched to an unattended device.
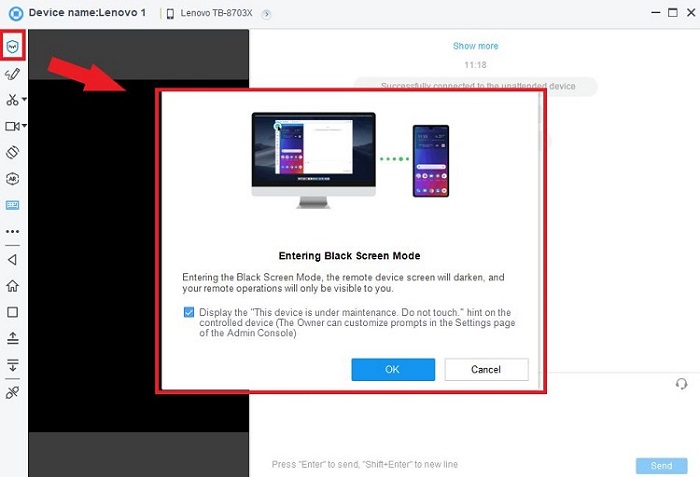
Black Screen Mode
Once the Windows is enrolled as an Unattended Device, you can enable the Black Screen Mode to maintain your unattended devices without leaking any sensitive company information.
Please note that the Black Screen Mode function is only available for the Standard plan or above, and you can only enable the function when the device is enrolled as an unattended device.
To enable the Black Screen Mode, please follow the steps below:
Step 1: Find the Windows device you want to control remotely on AirDroid Business Desktop Client and click "Connect."
Step 2: Click on "Black Screen Mode" in the top toolbar.
Step 3: A window will pop up, click "OK" to enter Black Screen Mode.
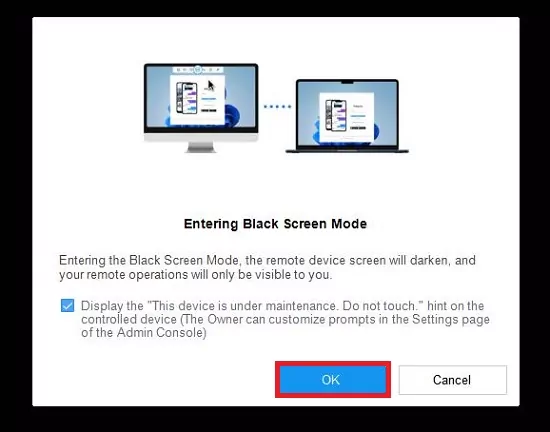
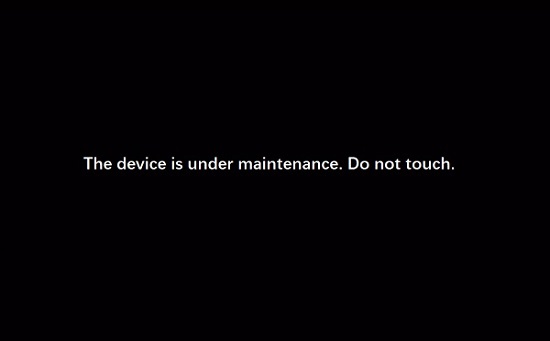
Step 4: The controlled end device will display a black screen with a string of text informing that the device is being maintained.
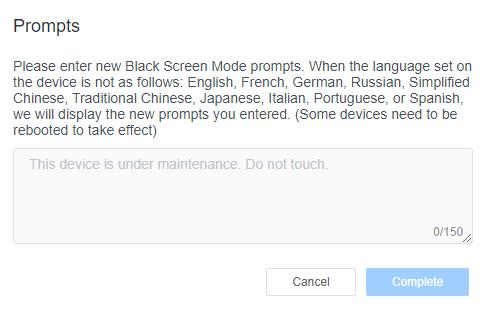
If your local language is not supported by AirDroid Remote Support for Business, you can change the Black Screen Mode's prompts with the steps below:
Step 1: Log in to the Admin Console (AirDroid Business Web) > Click the "setting" icon on the top right > Choose "Preferences" > Check the second option under the Remote support.
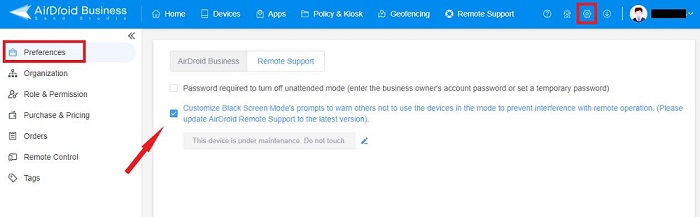
Step 2: Click the pencil icon right under the option, and you can customize the prompt for the unsupported language.
Invoke Remote Support Client
In addition to launching the AirDroid Business Desktop Client to initiate a remote connection, you can invoke the client from the Admin Console to initiate a remote connection directly to the device.
Step 1: Log in to the Admin Console and go to the device list.
Step 2: Click the "Remote Support" button in the " Operations" area on the right of the device list.
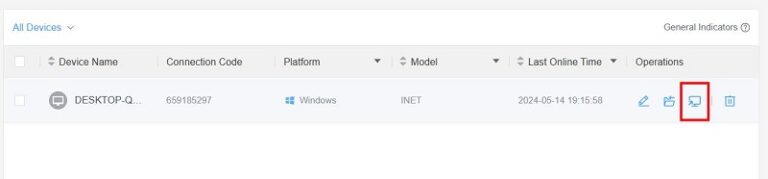
Step 3: A pop-up window appears in the Admin Console directing you to download/open the client, etc.
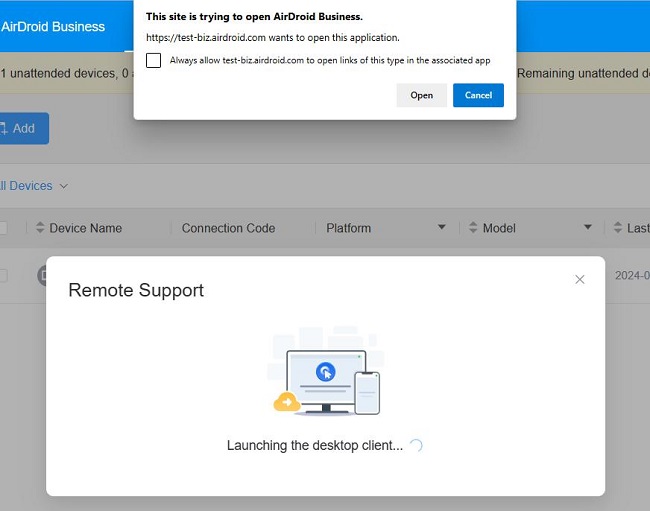
There are several specific situations:
- If the client has not been downloaded and installed, a pop-up window will appear in the Admin Console to guide the download.
- If the client is not logged in, it will automatically log in to the admin account and initiate a remote connection to the device selected by the Admin Console.
- If the client has logged into the same account as the Admin Console, it will initiate a remote connection directly to the device selected by the Admin Console after invoking.
- If the client is logged into a different account than the Admin Console, only the client is invoked.
Part 3: Remote Support for Android
To remotely support Android devices using AirDroid Remote Support, please refer to the following steps:
Connection
After you and your customer installed the essential applications, you can start a support session with no effort. There are two methods to initiate a support session, please check the steps below:
To initiate a support session with a 9-digit connection code
Step 1: Open the AirDoird Business Desktop Client and choose "ID Connect," there is a place for you to enter the 9-digit connection code from the customer. For example:
Step 2: Insert the 9-digit connection code provided by the AirDroid Remote Support application on the customer's mobile device and click "Connect", and wait for the customer to click "Accept" for the support session to start.
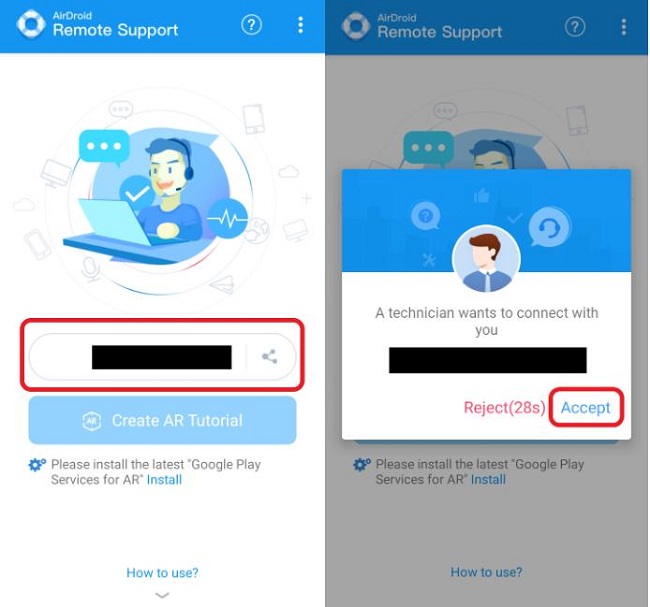
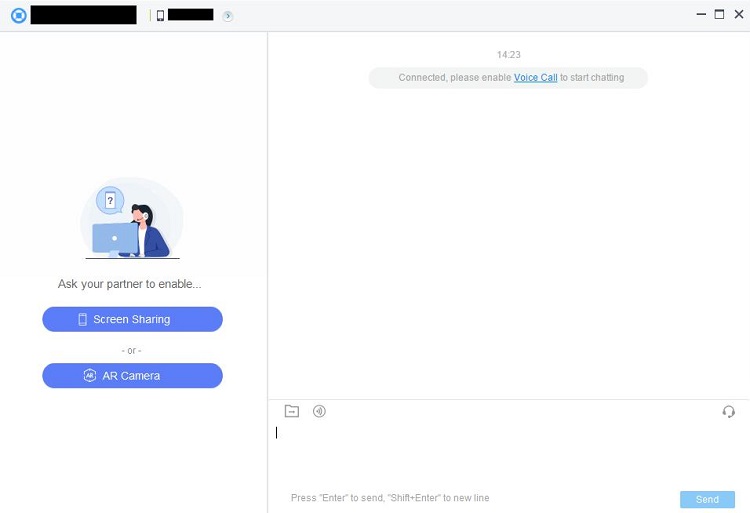
Step 3: You will see the screen on the AirDoird Business Desktop Client below after the customer clicks "Accept" from their end, and you can provide the support your customer needs from here.
To initiate a support session with the Device List:
Step 1: Once the device is enrolled in your organization or added as a Frequent Client's Device, you can locate the device on the device list and initiate a remote support session directly. Take the AirDoird Business Desktop Client as an example:
Step 2: You can initiate the remote support session without manually inserting the 9-digit connection code by clicking "Connect."
Step 3: If the device is enrolled as an unattended device then the session should start immediately. If the device is enrolled as an attended device or added as a frequent device, once the customer clicks "Accept" from their end, the session will be started.
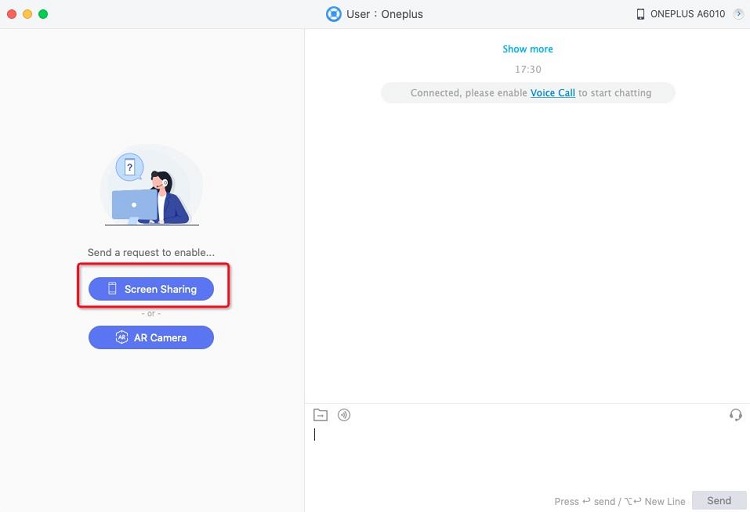
Screen Sharing
Both the support specialist's end and the customer's end can initiate screen sharing. If the device is unattended, screen sharing will automatically be enabled once the session is connected. If the device is attended, the other party's consent is required to start screen sharing.
From the support specialist's end
After a session is started, click "Screen Sharing" on the AirDoird Business Desktop Client from the left side of the window to request the customer to accept screen sharing.
From the customer's end
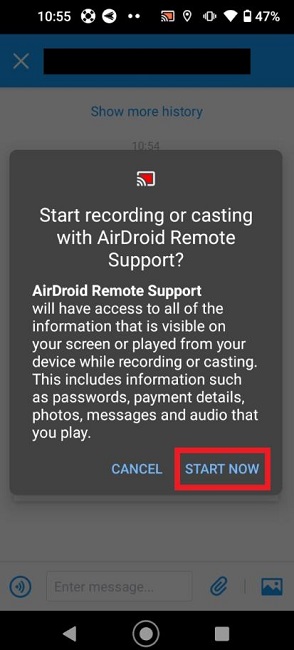
Step 1: In a remote support session, a customer can proactively share their screen by clicking the "Screen Sharing" button on the AirDoird Remote Support application.
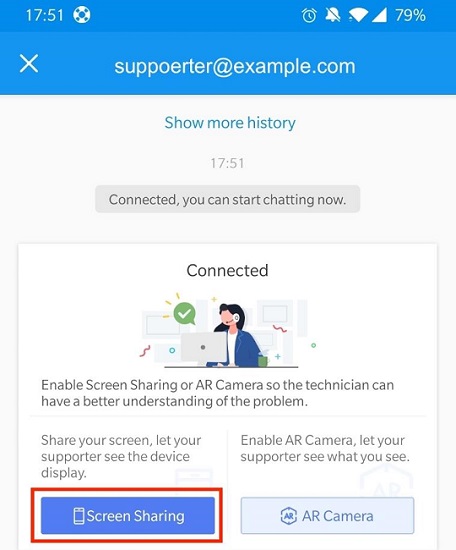
Step 2: After the request is accepted or when the customer chooses to share the screen, there will be a pop-up screen for the customer to confirm to share the screen.
Step 3: For Android 10 or below, please tap on "Don't show again" and "Start Now" to share your screen.
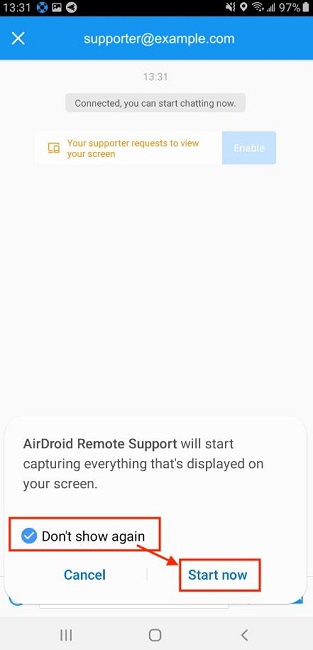
Step 4: For Android 11 or above, please tap on "START NOW" to share your screen.
The image below shows what is displayed when screen sharing is enabled on the AirDoird Business Desktop Client. Following is a brief introduction to all the functions shown in the picture.
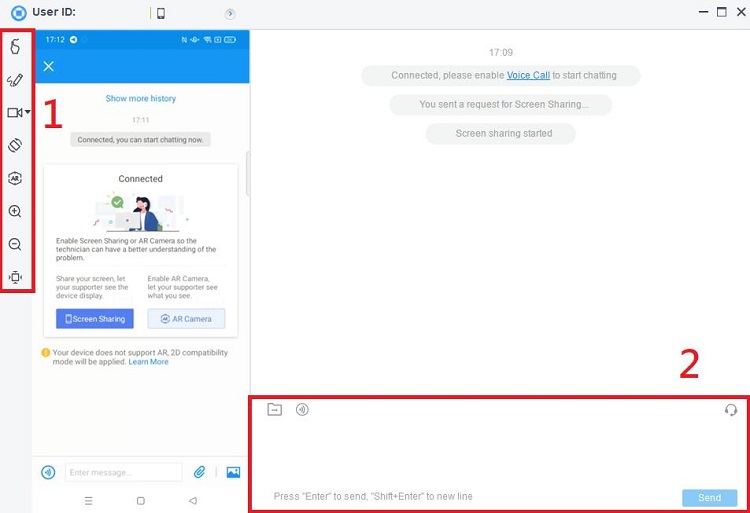
The functions on the left column from top to bottom are:
1. Tutorial Gesture: You can show the customer the gesture directly on the screen or request a remote control on the device.
2. Screenshot: You can take a screenshot, edit it, and send it to the customer immediately with this function.
3. Start recording: This function allows you to record the customer's action and provide support accordingly.
4. Rotate screen: It will rotate the screen on the support end.
5. Switch to AR Camera
6. Zoom in
7. Zoom out
8. Default size
The functions on the chat section next to the shared screen from left to right are:
1. Send Files
2. Voice Message
3. Voice Call
4. Text Message
Remote Control
The remote control feature for AirDroid Remote Support is enabled by installing an add-on (secured by AirDroid) on the client/user’s device.
To provide support with the remote control function, please follow the steps below:
Step 1: First, you need to follow the steps in the screen sharing guide to enable screen sharing.
Step 2: From the AirDroid Business Desktop Client (supporter), tap the "Tutorial Gesture" icon on the left-hand side, then tap "Remote Control" to enter remote control mode.
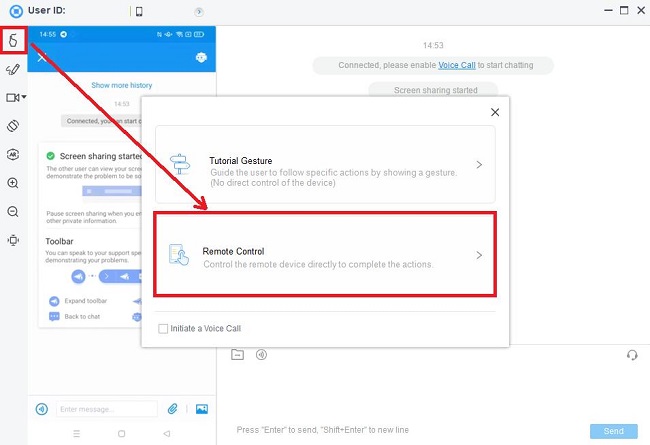
Step 3: Ask your client to tap the "Allow" and "Download now" buttons on their AirDroid Remote Support application, which will initiate the remote control add-on download process.

Step 4: Once the add-on is downloaded and installed, ask the client to return to the AirDroid Remote Support application and proceed with the following steps, "Enable permission" > Installed services > "Allow" for the add-on to work properly.
Step 5: The remote control will be enabled automatically after the add-on grants permission.
Unattended Mode
If you have enrolled the device as an unattended device, you can initiate support directly on the Desktop Client. If you have enrolled the device as an attended device, you can also switch the device to unattended mode.
Device has been added to the organization as an unattended device
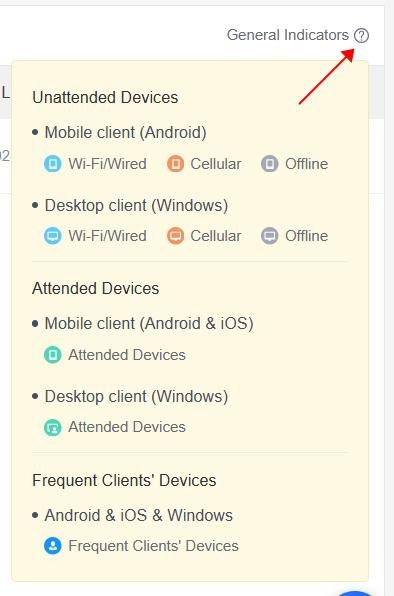
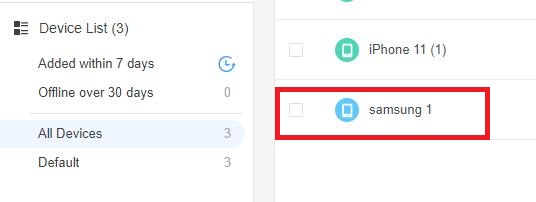
After enrolling an unattended device in your organization, you can check the status of the device at any time for maintenance. Log in to the Admin Console (AirDroid Business Web) and find the specific group or "All Devices." The devices marked in blue in all devices are unattended devices using Wi-Fi/Wired, those marked in orange are unattended devices using cellular, and those marked in gray are unattended devices that are offline.
To remotely support an unattended device, refer to the following steps:
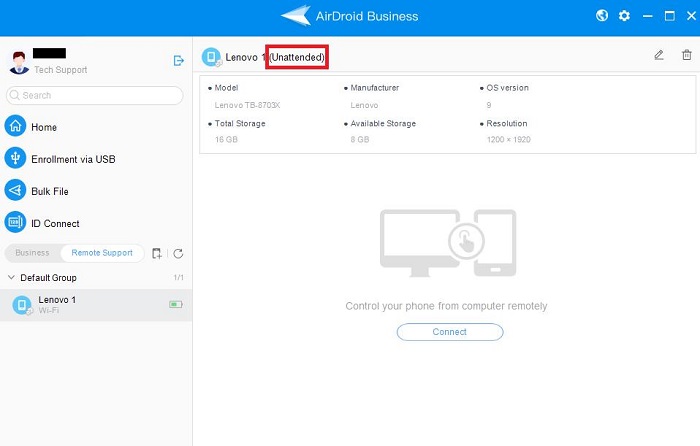
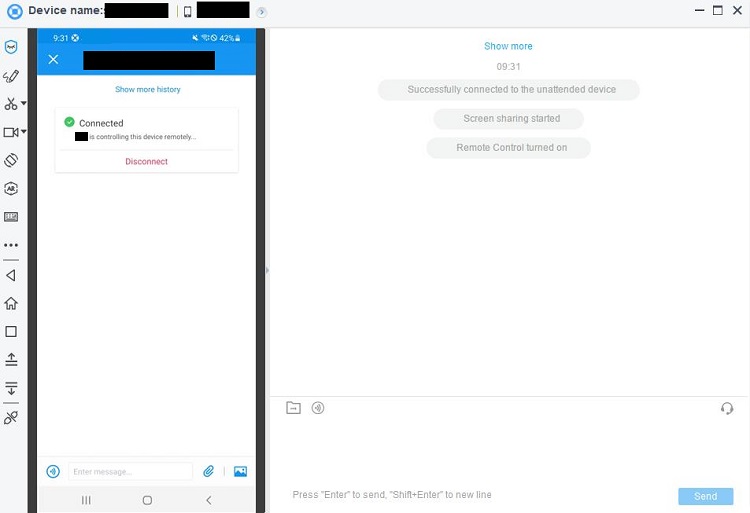
Step 1: Open and log in to the AirDroid Business Desktop Client > Find the unattended device you want to remote control. Then click "Connect" to establish a remote control session.
Step 2: Once connected to an unattended device, screen sharing and remote control features are automatically enabled. You can directly solve device problems remotely and perform operations such as file transfer.
Device has been added to the organization as an attended device
After enrolling an attended device in your organization, you could enable the Unattended Mode for your device so that you can remote control the unattended devices when needed.
To enable the Unattended Mode, please follow the steps below:
Step 1: If you already enrolled the device in your organization, please open the AirDroid Remote Support application on the enrolled device and click the button that shows "Attended."
Step 2: Click the "Unattended" button next to the "Deployment method."
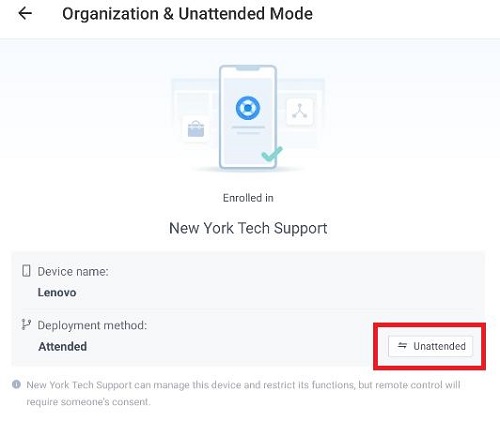
Step 3: You will have to wait for 5 seconds and click "OK" to give consent for activating the Unattended Mode.
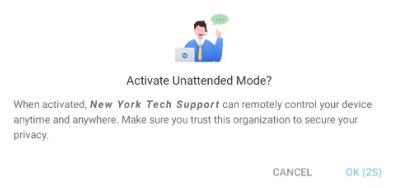
Step 4: Click "Continue", and the application will guide you to the Play Store to download the add-on. If your device does not have the Play Store, the add-on will be downloaded via the browser. Please follow the instruction to complete the installation and permission authorization for Accessibility.
Step 5: Follow the instructions shown on the screen to authorize AirDroid Remote Support for the unattended mode fully.

Step 6: After granting all permissions, the unattended mode is enabled successfully. You can start remote support for unattended devices.
Black Screen Mode
Once the device is enrolled as an Unattended Device, you can enable the Black Screen Mode to maintain your unattended devices without leaking any sensitive company information.
Please note that the Black Screen Mode function is only available for the Standard plan or above, and you can only enable the function when the device is enrolled as an unattended device.
To enable the Black Screen Mode, please follow the steps below:
Step 1: Open and log in to the AirDroid Business Desktop Client > Find the unattended device you want to remote control.
Step 2: Click "Connect" to establish a remote control session > Find the "Black Screen Mode" button on the top left > Click the icon to enable.
If your local language is not supported by AirDroid Remote Support for Business, you can change the Black Screen Mode's prompts with the steps below:
Step 1: Log in to the Admin Console (AirDroid Business Web) > Click the "setting" icon on the top right > Choose "Preferences" > Check the second option under the Remote support.
Step 2: Click the pencil icon right under the option, and you can customize the prompt for the unsupported language.
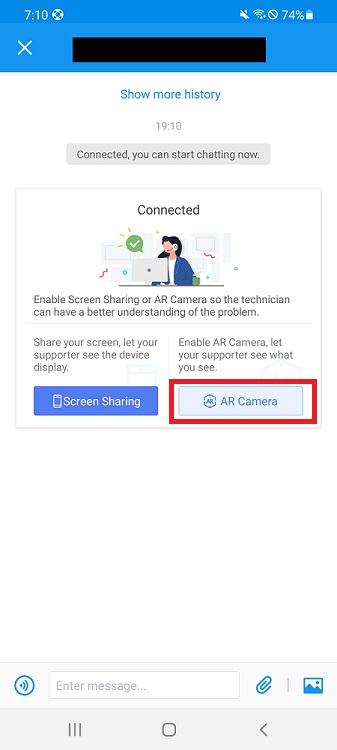
AR Camera
AR Camera allows you to see through the customers' device camera and guide your customers by placing 3D markers onto real-world objects. But for Android devices, the ARCore must be installed on the device that requests the support to enable the AR functions on AirDroid Remote Support.
Please remind the information below for you to use the AR function smoothly:
- The system of the device must be Android 7 or above.
- If your devices do not preload with ARCore, you can directly download the ARCore from Google Play.
- Some devices do not preload with the Google Play app you may find the ARCore on the App store provided by the manufacturer.
- If the ARCore application is not listed on such stores, please consult with the manufacturer to download relevant applications.
Both the support specialist's end and the customer's end can enable AR camera. Please refer to the following steps:
From the support specialist's end
Step 1: After a session is started, click "AR Camera" on the AirDoird Business Desktop Client to request the customer to enable the AR camera feature.
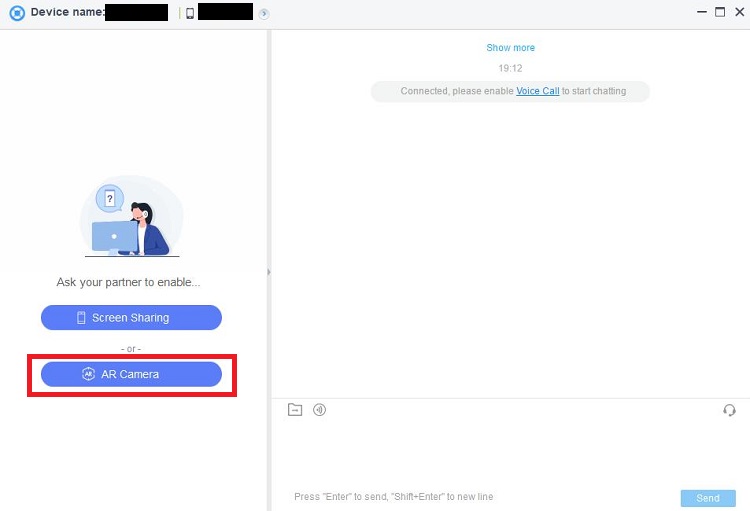
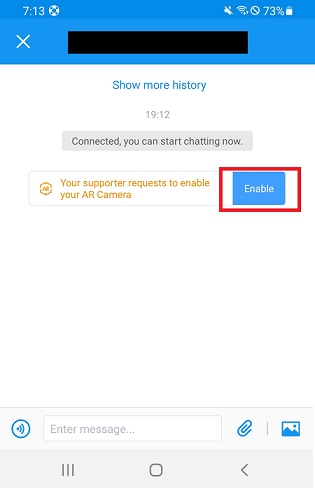
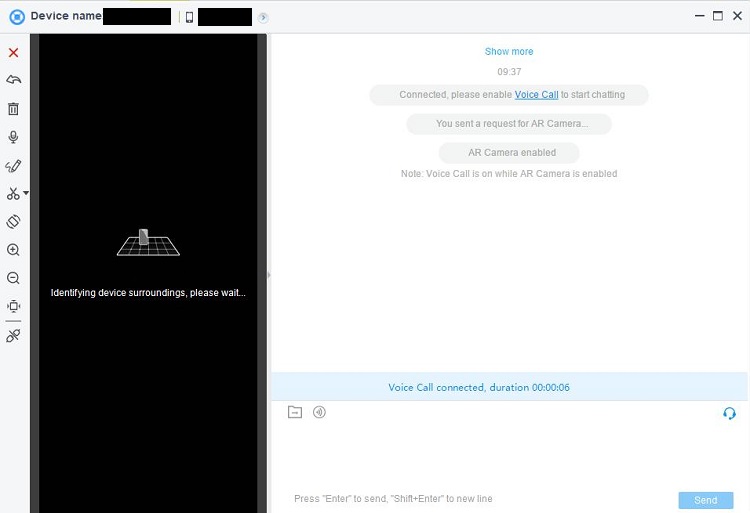
Step 2: Customer needs to click "Enable" in the session window of AirDroid Remote Support application to enable the AR camera function. Then click "Continue" in the pop-up window, and the customer can use the voice call to communicate with the support specialist at the same time.

Step 3: After the customer has enabled the AR Camera, the support specialist can assist the customer using the AR Camera and Voice Call on the AirDoird Business Desktop Client.
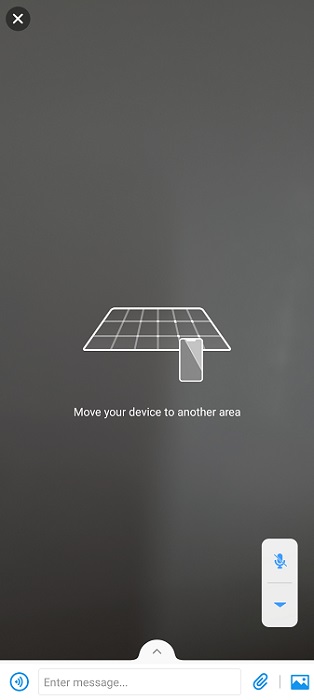
From the customer's end
Step 1: In a remote support session, a customer can proactively enable AR Camera by clicking the "AR Camera" button on the AirDoird Remote Support application.
Step 2: Once the AR camera is enabled, customers can use the camera to communicate remotely with support specialists.
Part 4: Remote Support for iOS
Connection
The connection steps for iOS devices are the same as Android devices, you can refer to the connection guide for Android devices.
Screen Sharing
You can refer to the screen sharing steps for Android devices. iOS devices require the following additional actions:
After the request is accepted or when the customer chooses to share the screen, there will be a pop-up screen for the customer to confirm to share the screen.
Step 1: Swipe up from the screen button to open "Control Center."
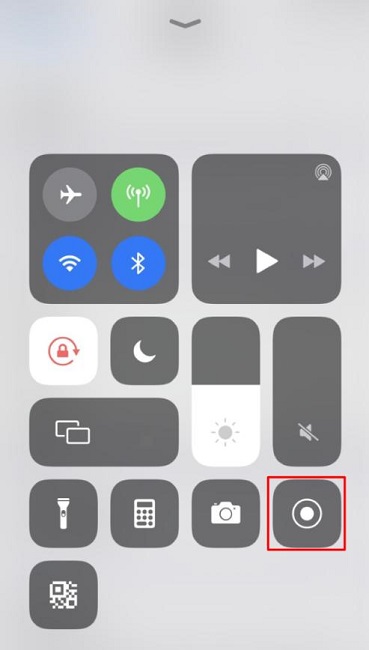
Step 2: Long press the "Screen Recording" button (Note: Make sure to press and hold.)
Return to Home Page > Open "Settings" > Find "Control Center" > Tap "Customize Controls" > Find "Screen Recording" and press "+".
Step 3: Select Remote Support in the pop-up dialogue, and tap "Start Broadcast."
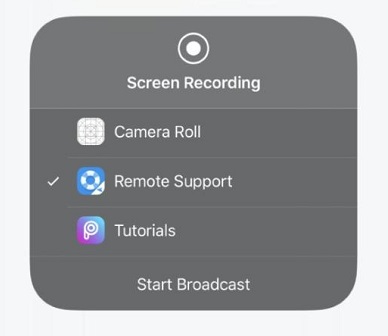
Step 4: Return to AirDroid Remote Support app.
AR Camera
AR Camera allows you to see through the customers' device camera and guide your customers by placing 3D markers onto real-world objects. But for iOS devices, the ARCore must be installed on the device that requests the support to enable the AR functions on AirDroid Remote Support. If your devices do not preload with ARCore, you can directly download the ARCore from Google Play.
To enable and use the AR Camera on iOS devices, please refer to the AR Camera guide for Android.
Part 5: Usage Report & Logs
In the Admin Console (AirDroid Business Web), you can view detailed service data and logs.
Usage Dashboard
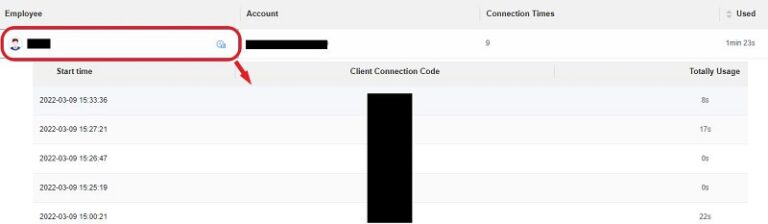
Step 1: Login the Admin Console (AirDroid Business Web) > Remote Support > Dashboard.
Step 2: You can see the Usage of your support time and set a period to generate a graphic of the usage summary.
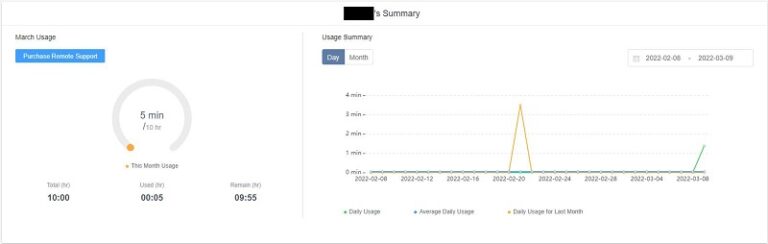
Step 3: From here, you can also see the individual employee usage, and if you click on the name of an employee, you can see the connection log of the employee.
Access Device Logs
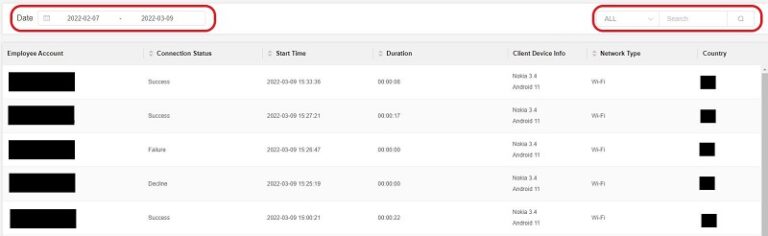
Step 1: Login the Admin Console (AirDroid Business Web) > Remote Support > Logs.
Step 2: On this page, you can see the complete logs of Remote Support. You can select the designated time period to combine with the filter to see the record you need.
Part 5: AirDroid Remote Support for Personal
Get Started
- If you are providing assistance to a parent or friend, you will need to install AirMirror on your phone as the console software.
- Your parents, or anyone else who needs to get help from you, will need to install AirDroid Remote Support on their phone as the controlled software.
We have created a YouTube video to help you understand this guide better and faster.
Video Tutorial: How to Provide Android Remote Tech Support for Friends and Family
How to Connect
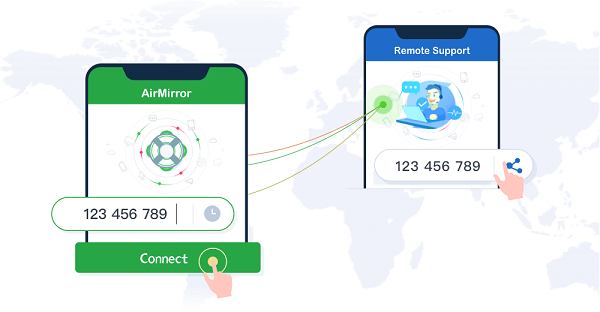
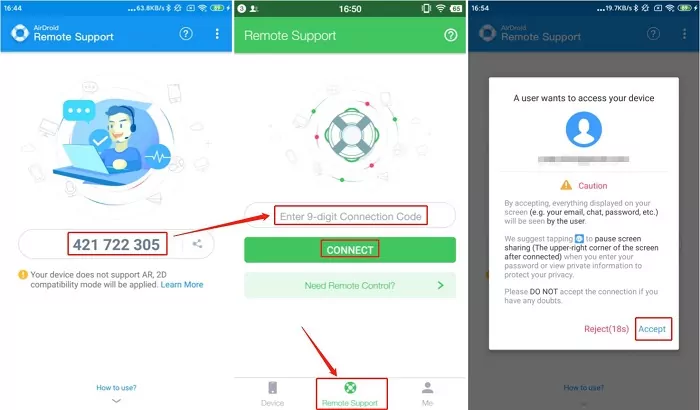
Open AirMirror, tap Remote Support and enter the 9-digital connection code on AirDroid Remote Support App.
How to Use Screen Sharing
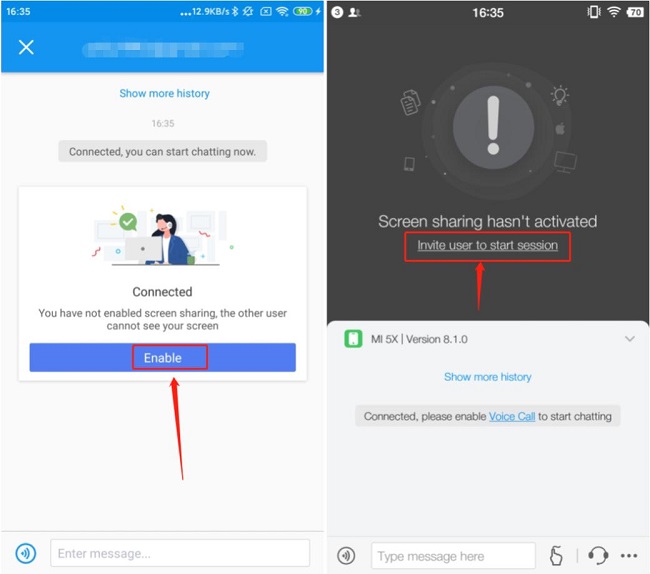
After the connection succeeds:
For Android device:
Tap the “Start” button in the chat area, and your screen will be shared.
For iOS device:
Step 1: Swipe up from the screen button to open "Control Center."
Step 2: Long press the "Screen Recording" button (Note: Make sure to press and hold.)
Return to Home Page > Open "Settings" > Find "Control Center" > Tap "Customize Controls" > Find "Screen Recording" and press "+".
Step 3: Select Remote Support in the pop-up dialogue, and tap "Start Broadcast."
Step 4: Return to Remote Support.
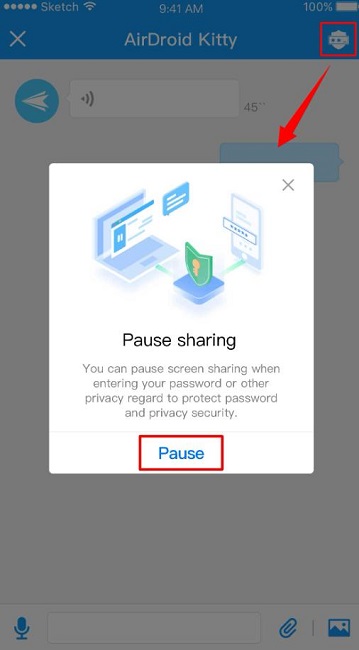
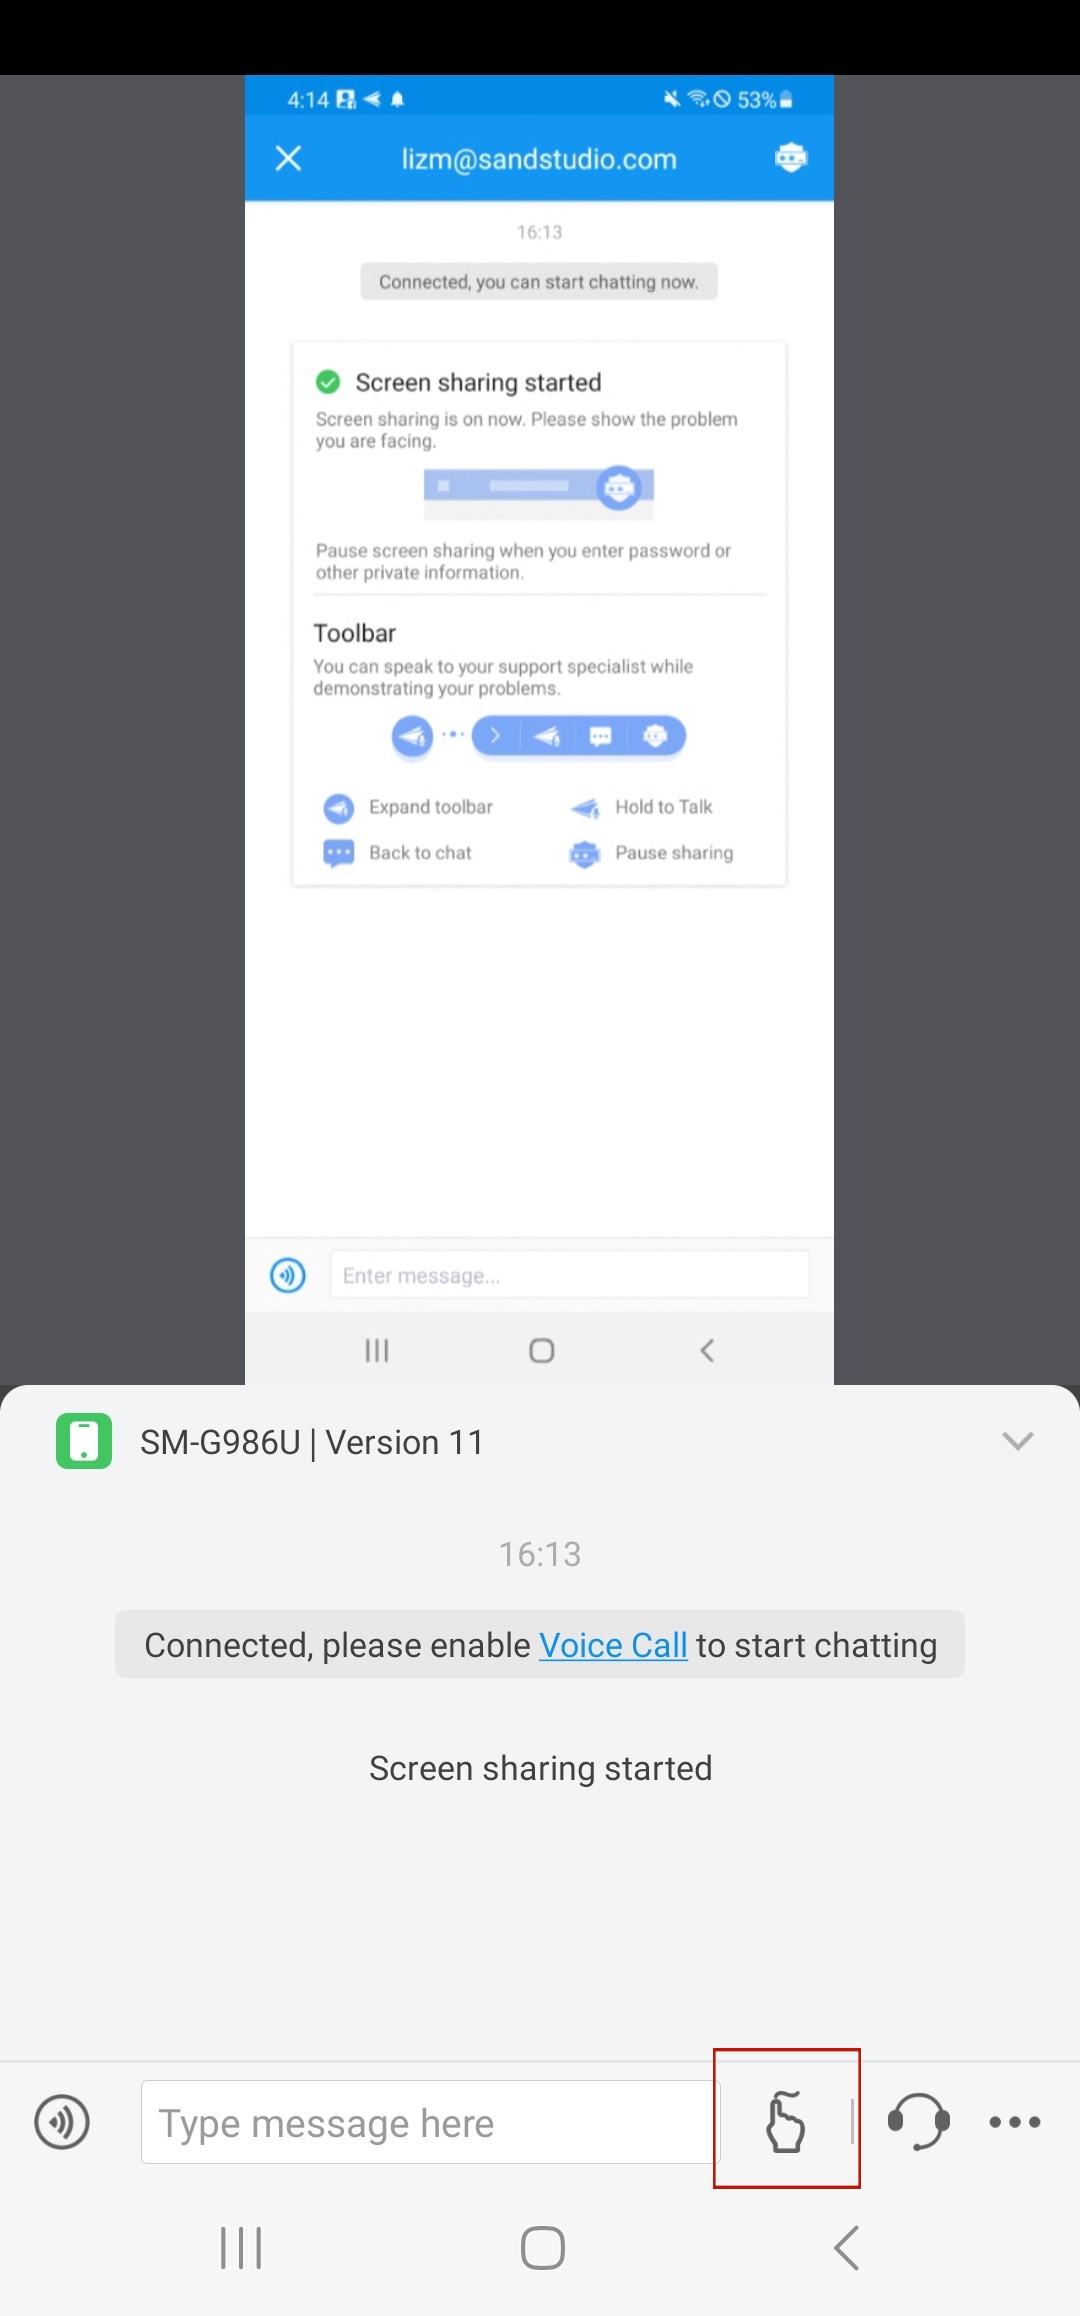
After you share your screen, the other party will see everything shown on it. To protect your privacy, pause screen sharing before entering private information.
How to Use Remote Control (Only for Android)
Now, you can control your partner's Android devices directly when you help them solve the phone issues, without setting up by tethering the device to a computer or rooting it. You need to install an AirDroid Control Add-on.
What is AirDroid Control Add-on?
AirDroid Control Add-on is a plugin of AirDroid Remote Support that adds remote control functionality to AirMirror. With this add-on service enabled, you can provide a better remote support service by remotely controlling the devices directly, which is more efficient than voice chat, screenshots, and gestures features.
System and App Version Requirements:
- AirDroid Control Add-on is currently only available on Android 7.0 or above (It means the controlled/supported device needs to run Android 7.0 or above )
- The AirDroid Remote Support App needs to be updated to v 1.0.4.0 or above
- The AirMirror App for Android needs to be updated to v 1.0.7.0 or above
- The AirMirror App for iOS needs to be updated to v 1.0.4 or above
How to download AirDroid Control Add-on and Enable the Remote Control function?
Step 1: Establish the connection
1. Find the 9-digit Connection Code on the AirDroid Remote Support App.
2. Enter the code in the Remote Support module of the AirMirror App.
3. Accept the request on the AirDroid Remote Support App.
Step 2: Enable the screen sharing after connected
1. You can enable screen sharing from either side.
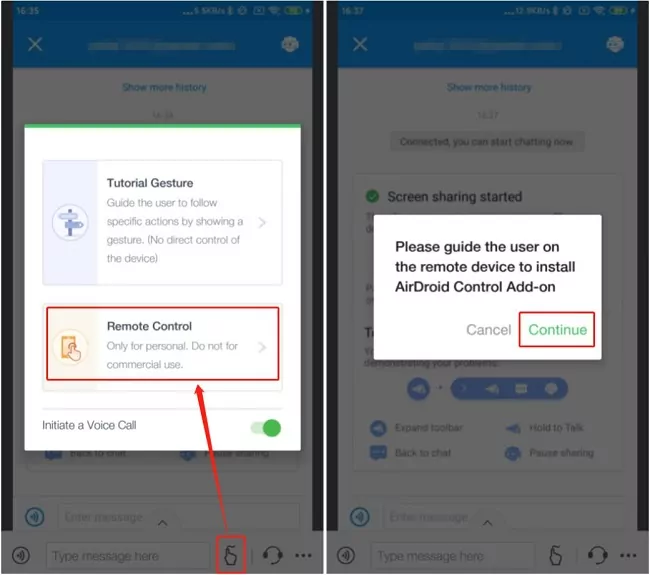
Step 3: Enable Remote Control Mode on the AirMirror App
1. Tap the "Turorial Gesture" icon near the Textbox.
2. Tap "Remote Control" on the pop-up window ( You need to upgrade to the premium).
3. If a pop-up window "Please guide the user on the remote device to install AirDroid Control Add-on" appears, please tap "Continue".
Step 4: Download and Install AirDroid Control Add-on on the AirDroid Remote Support App
To make sure the Remote Control Mode works on the AirMiror App, the AirDroid Control Add-on should be installed on the AirDroid Remote Support. Below are the steps:
1. Tap "Allow" next to the reminder message "Your supporter requests to remote control your device."
2. Tap "Download now" next to the reminder message "Please download and install the AirDroid Control Add-on for your device."
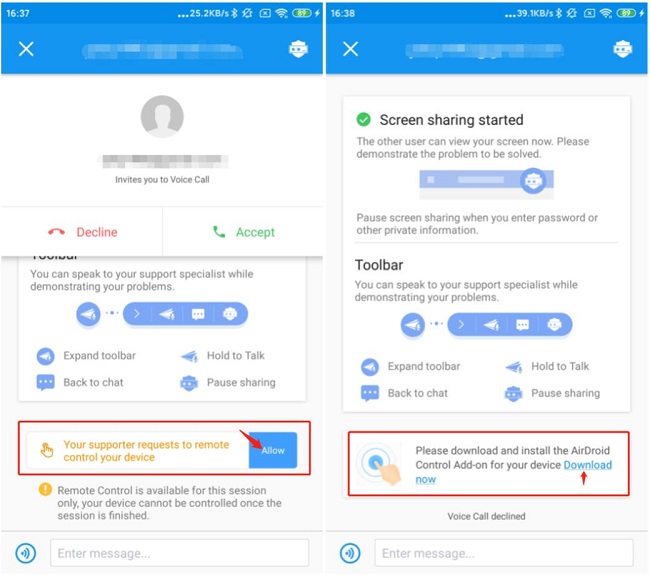
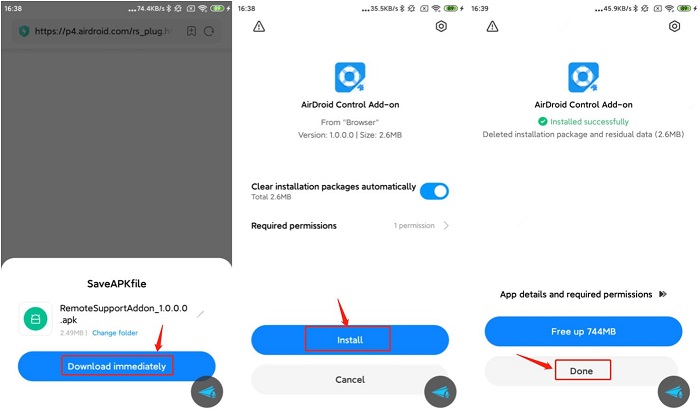
3. Follow the instruction to download and complete the installation.
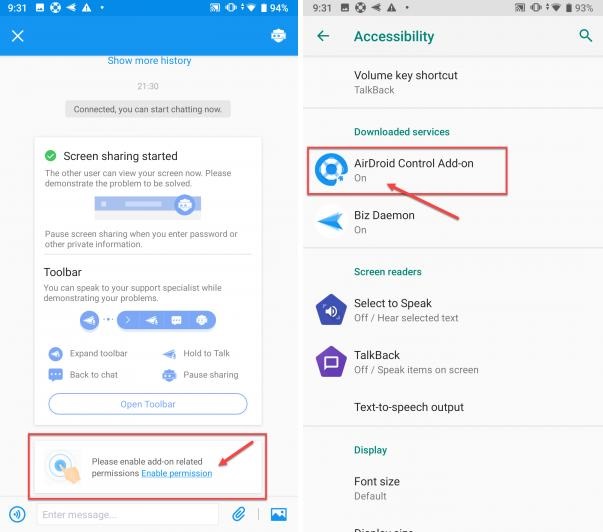
Step 5: Enable AirDroid Control Add-on on Accessibility
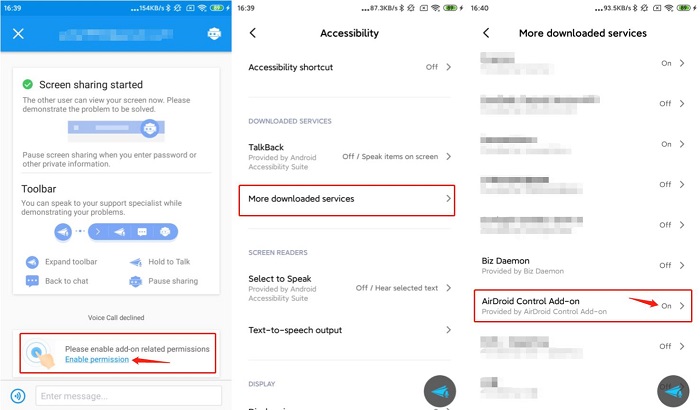
Once AirDroid Control Add-on be installed on the AirDroid Remote Support, return to the AirDroid Remote Support App and enable the Add-on on the Accessibility.
1. Tap "Enable Permission" next to the reminder message "Please enable add-on related permissions."
2. Tap "More downloaded services."
3. Find AirDroid Control Add-on and Turn it On.
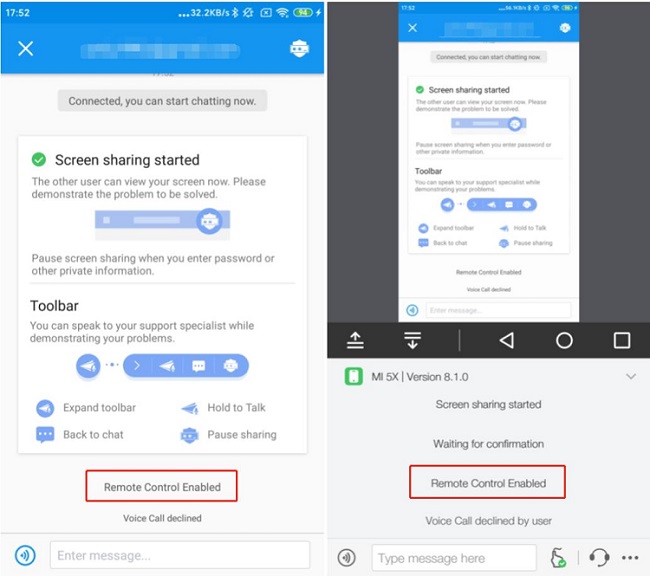
After all the above steps are done, return to the AirDroid Remote Support app again. If the reminder message "Remote Control Enabled" appears, it means you can use the AirMirror app to remote control the controlled device now.
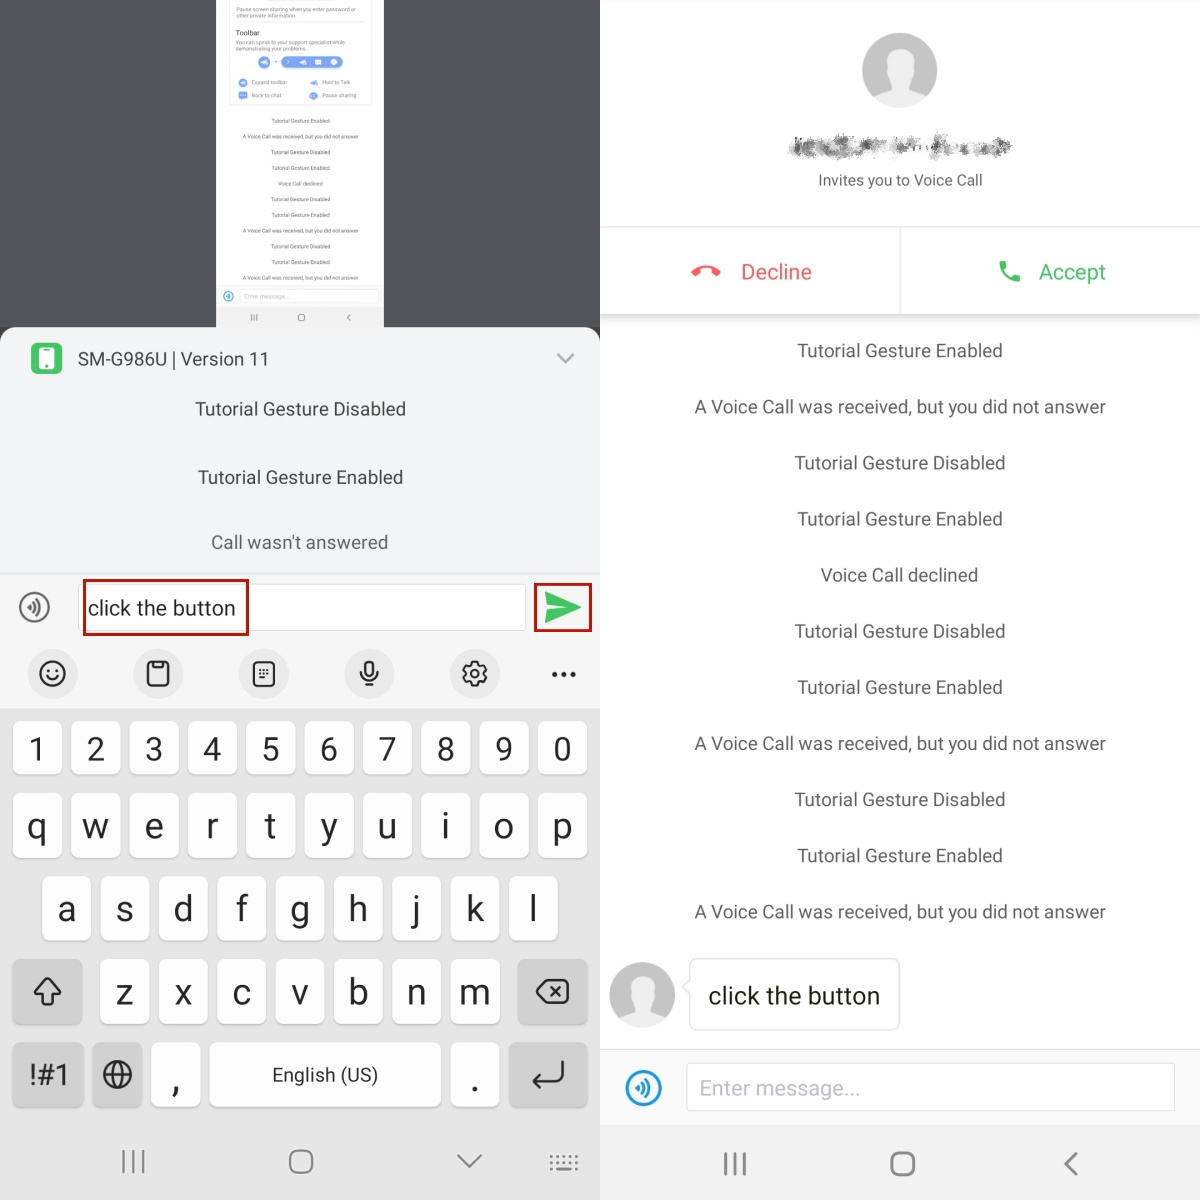
How to Use Tutorial Gesture
With this feature, you can connect a remote device that needs help and assist them in solving their problem with gesture guidance. You will see the remote screen in real time on your device. When you tap on your screen, the other person will see the gesture guide for tapping or swiping the screen.
Step 1: When you have established connection and enabled screen sharing. Tap on the the finger icon in the bottom menu bar.
Step 2: Choose Tutorial Gesture. The gesture tutorial mode will be enabled then.
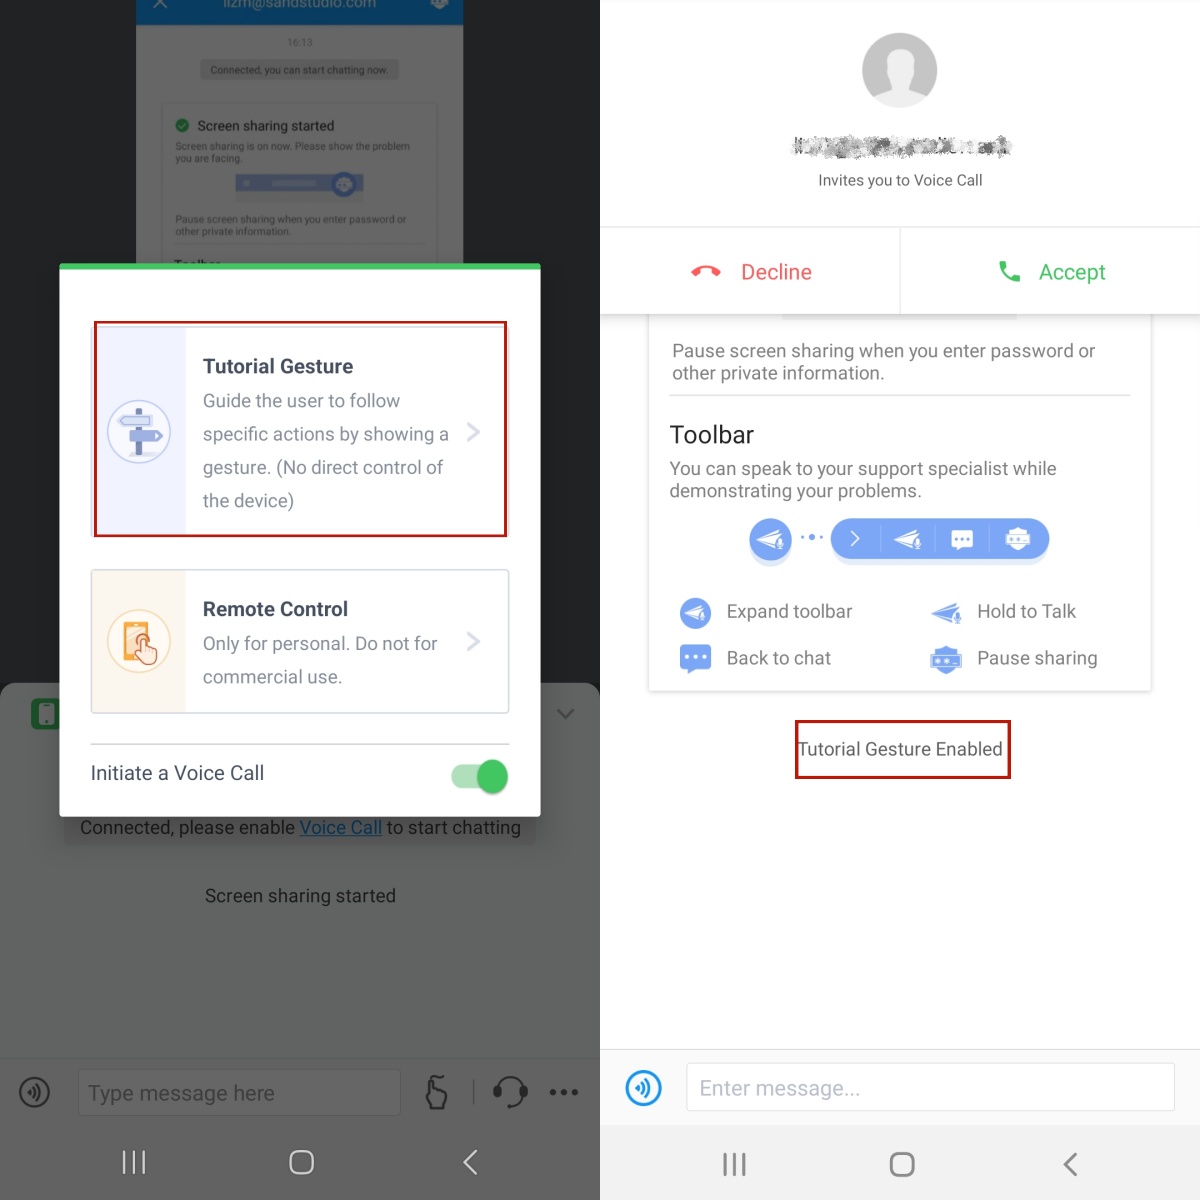
Step 3: On the controlled device, you will see the tapping or swiping.
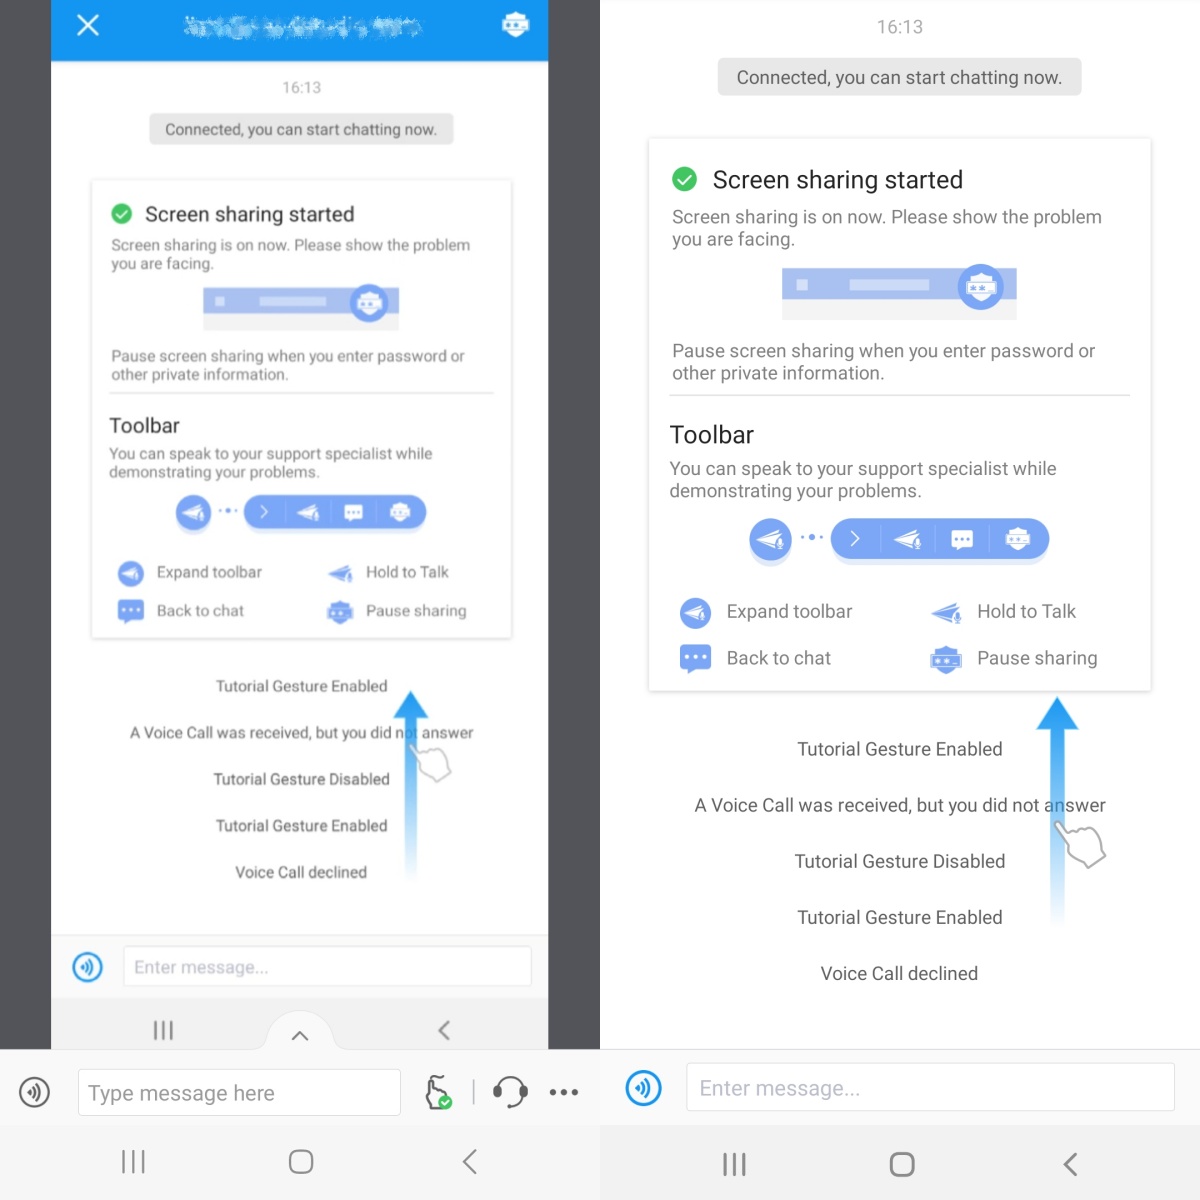
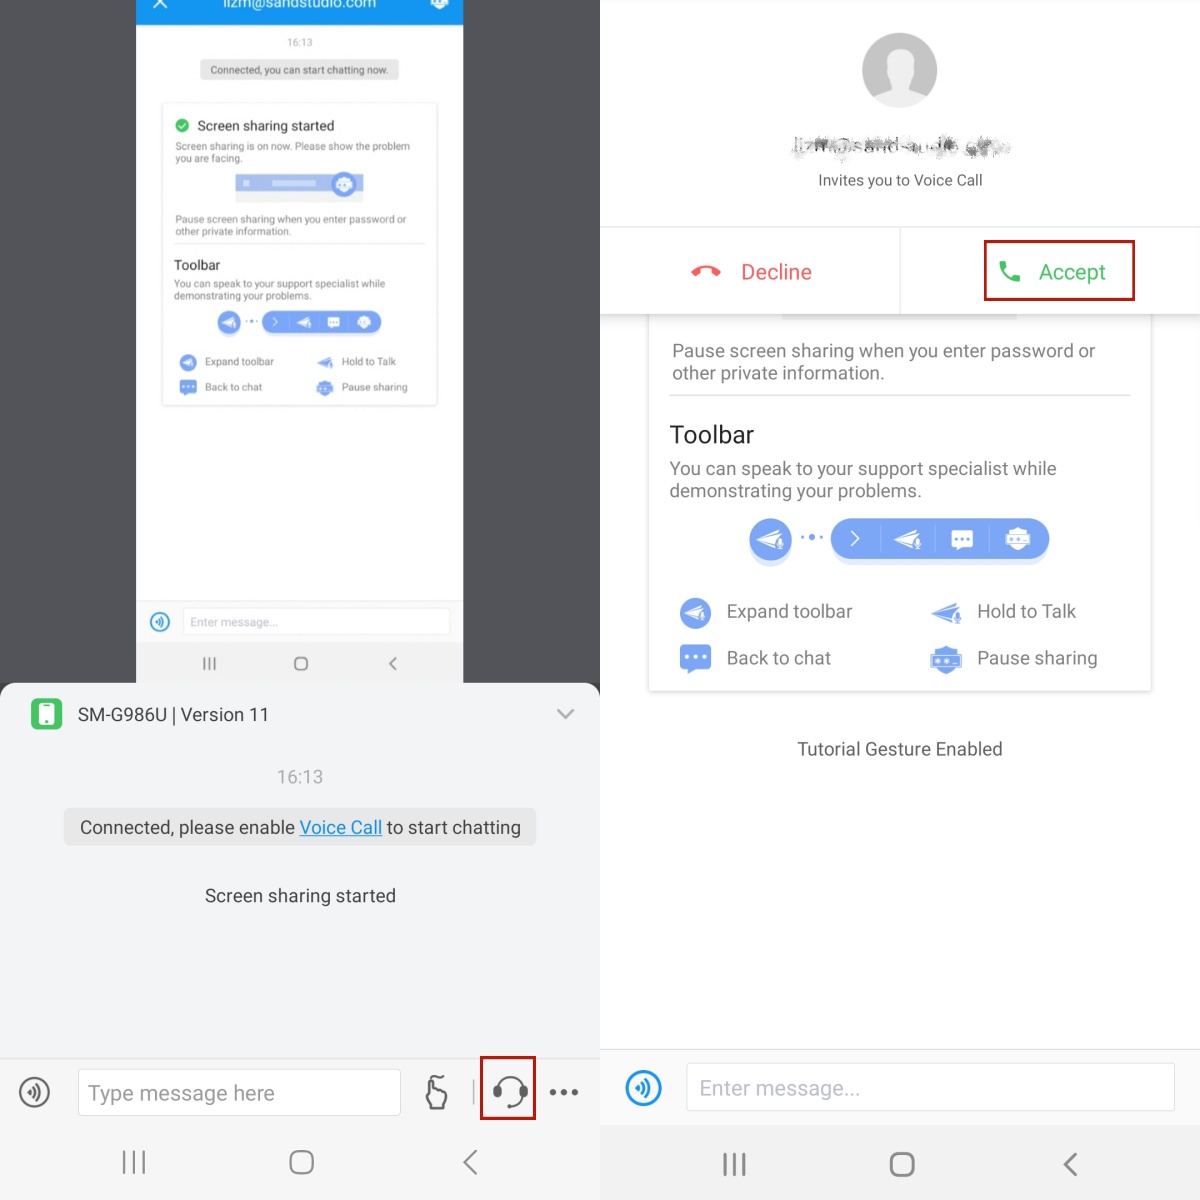
How to Use Voice Call
You can communicate with the console via text messages and voice calls during remote support. When you connect to a remote device, a voice call is initiated by default. But if you uncheck this option, you can send text messages and initiate voice calls from the bottom menu bar.
To send text messages, type the messages and tap send icon.
To initiate a voice call, tap the earphone icon, then tap Accept on the controlled device.